Inside: download and sew this convertible purse / backpack free sewing pattern. This bag is perfect for nearly all occasions and has been a favorite of mine for years.
{Original post 6/2016 … updated 7/2023}
Happy Friday everyone! I’ve got a free pattern Friday share today! I’ve designed a new bag pattern and I’m in love with this convertible purse / backpack free sewing pattern. This post has the free written tutorial and NEW for this update is a video tutorial full walk through that you can purchase to go with this free pattern if you need more help.
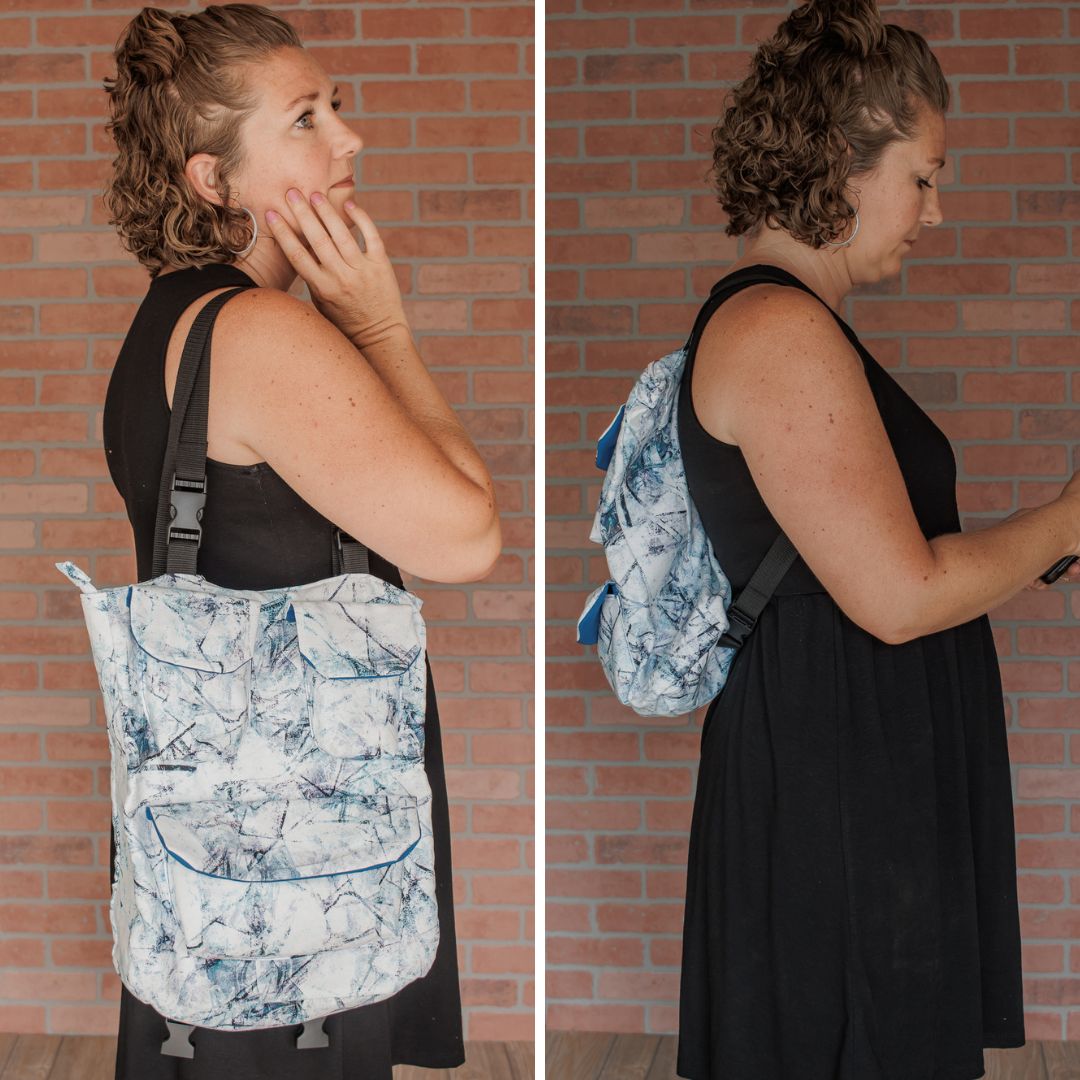
I love that I can wear in on my shoulder OR as a backpack. I’ve had it done for a few weeks and have used it SO much already… both ways! Just use the clips to change from backpack straps to shoulder straps… easy! You can find loads of photos on the first page and the photo tutorial on the second page. Head over to my shop to download the free pdf pattern.
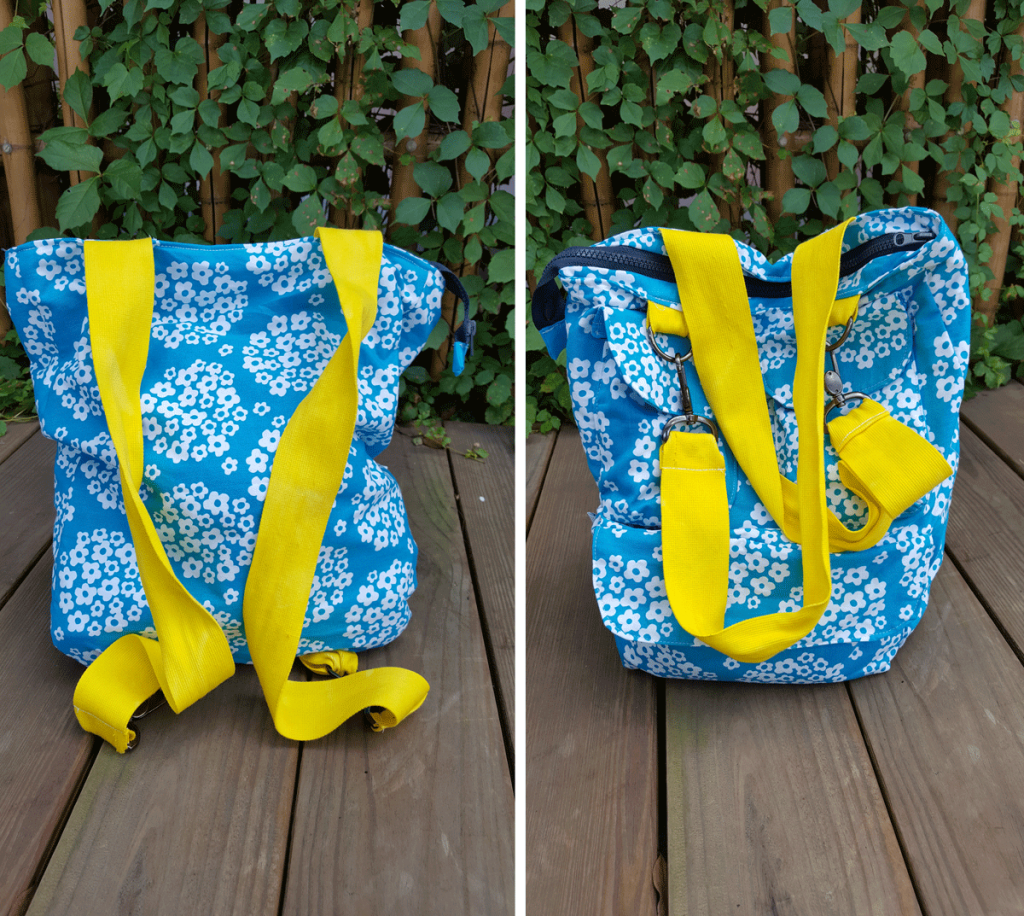
Convertible Backpack/shoulder bag
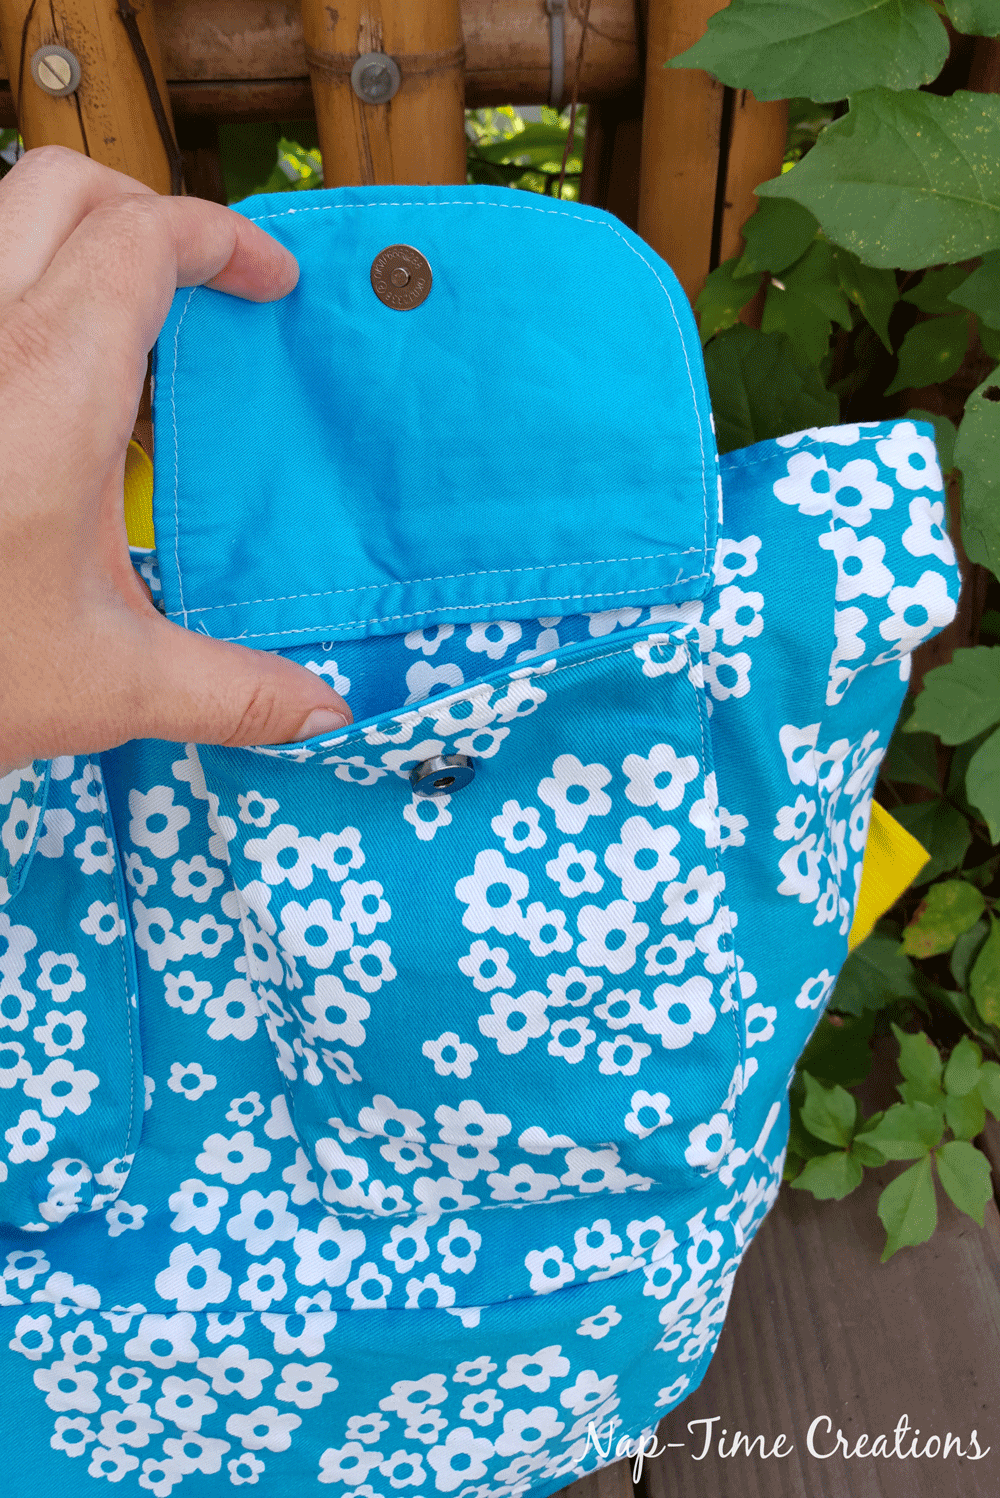
As I’ve mentioned with my other bag pattern, I LOVE a bag with good pockets! And this one has them! Three magnet pockets on the outside, and two pockets inside as well.
The newer version was made with velcro closures and buckles. I love both versions!
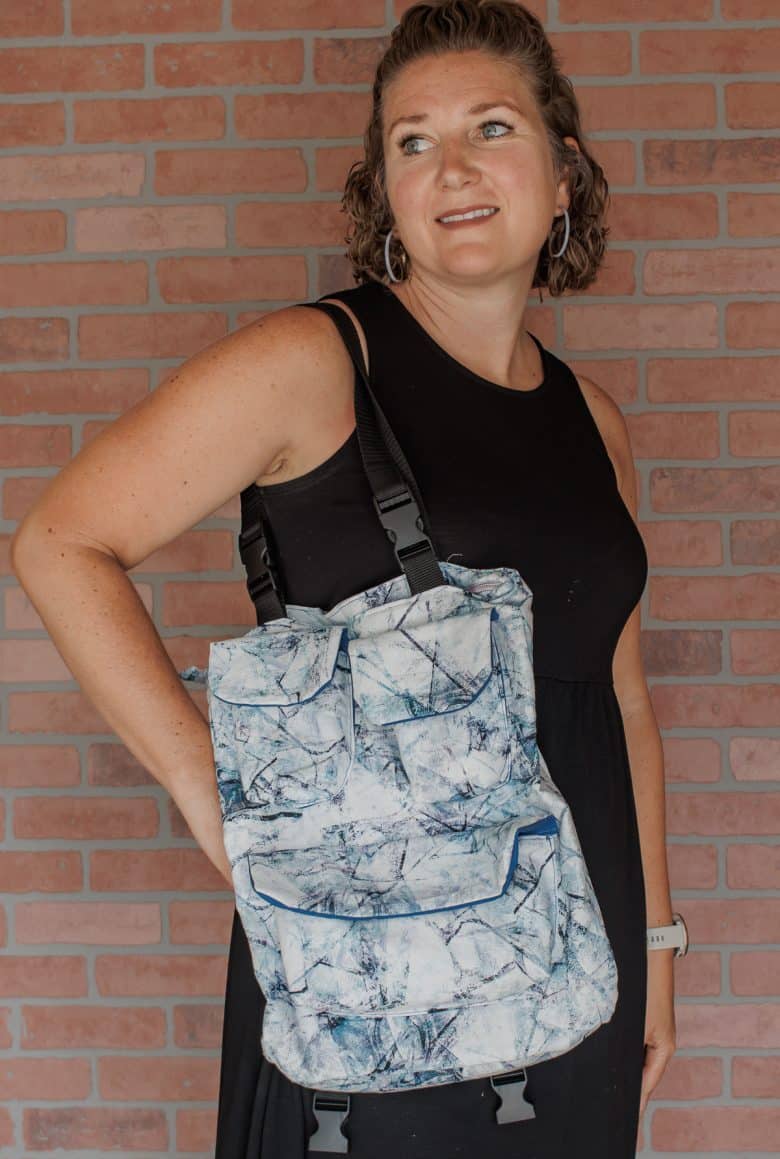
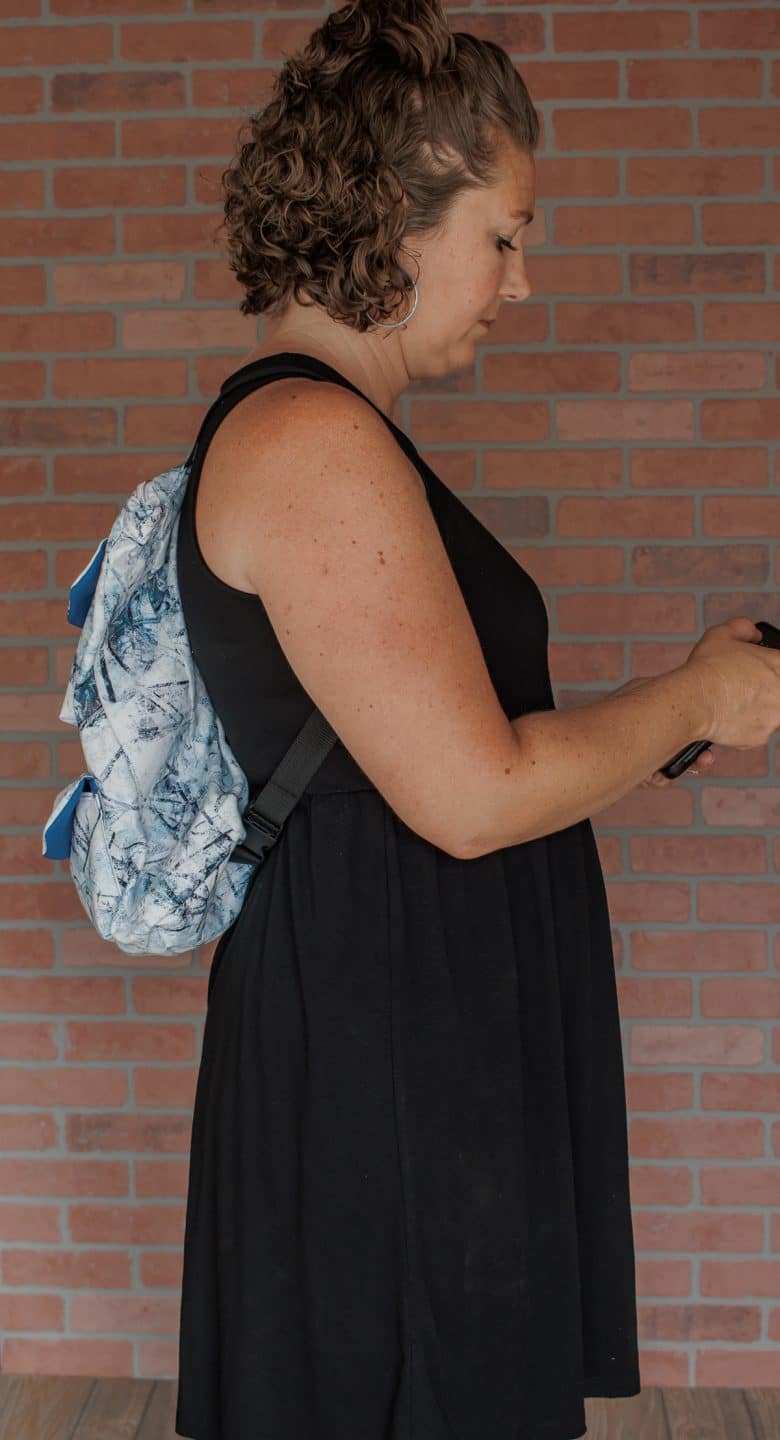
Here is the bag with the straps configured for a Backpack on the left and the over the shoulder on the right. Using the bag clips I added to the end of the straps, it takes about 5 seconds to switch between the styles.
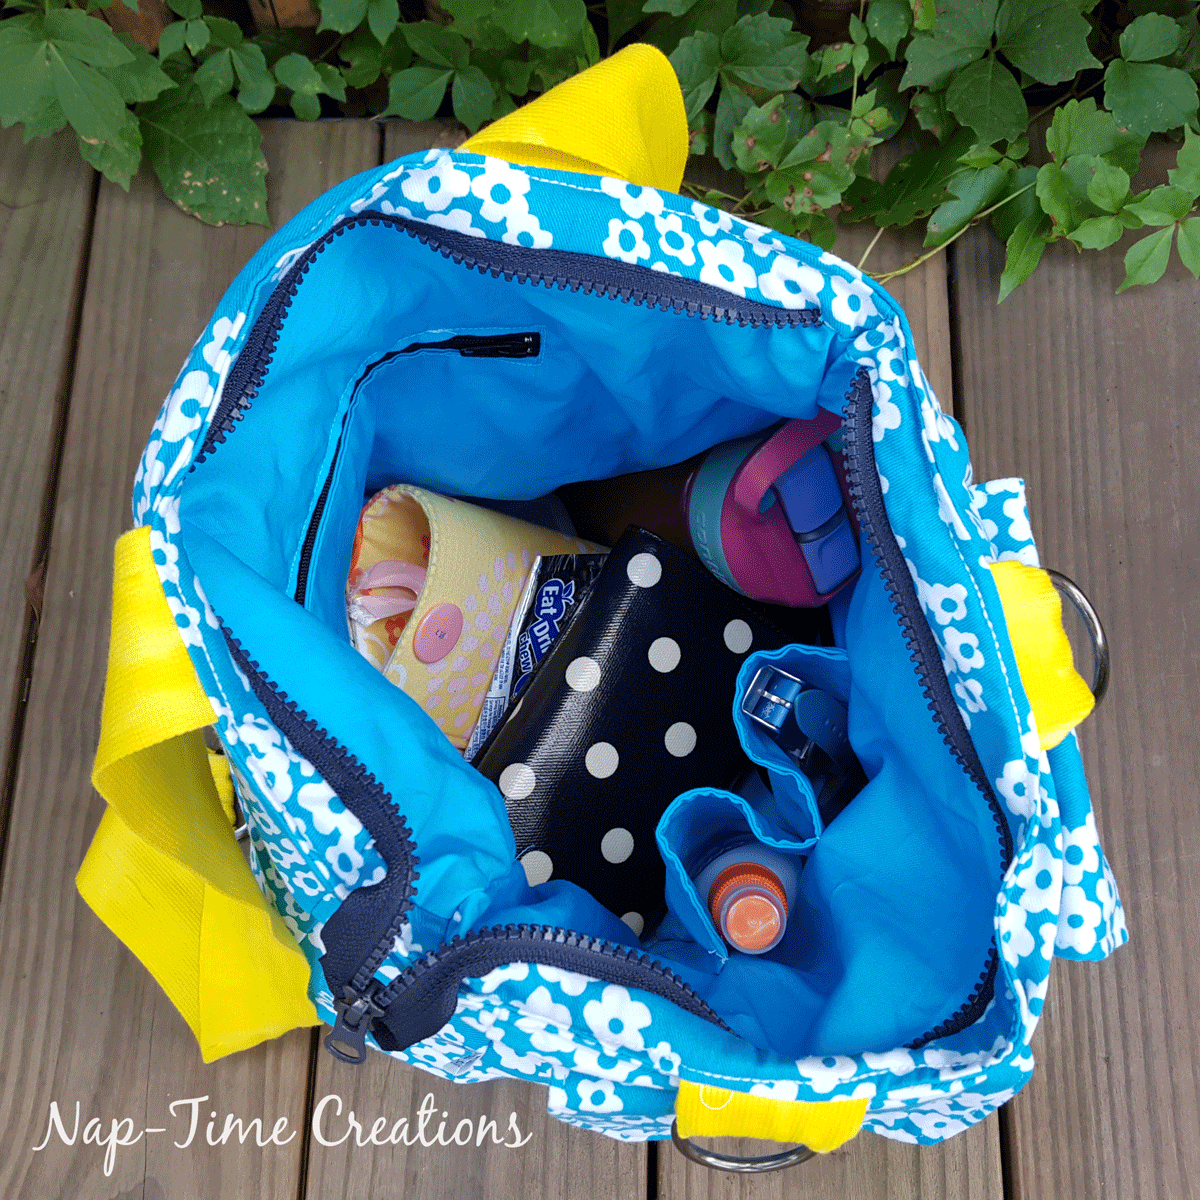
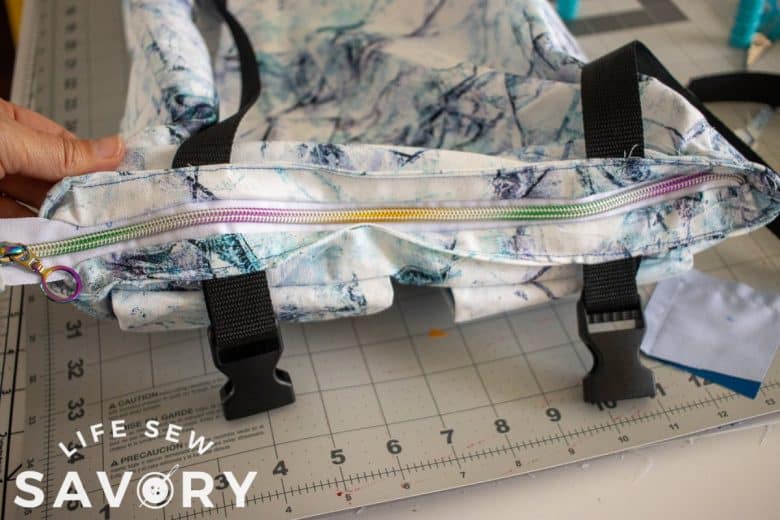
My top zipper is a two way zip, so I can open either direction, it’s been handy! You can also see the two inside pockets. A zipper one on the left and an open one on the right.
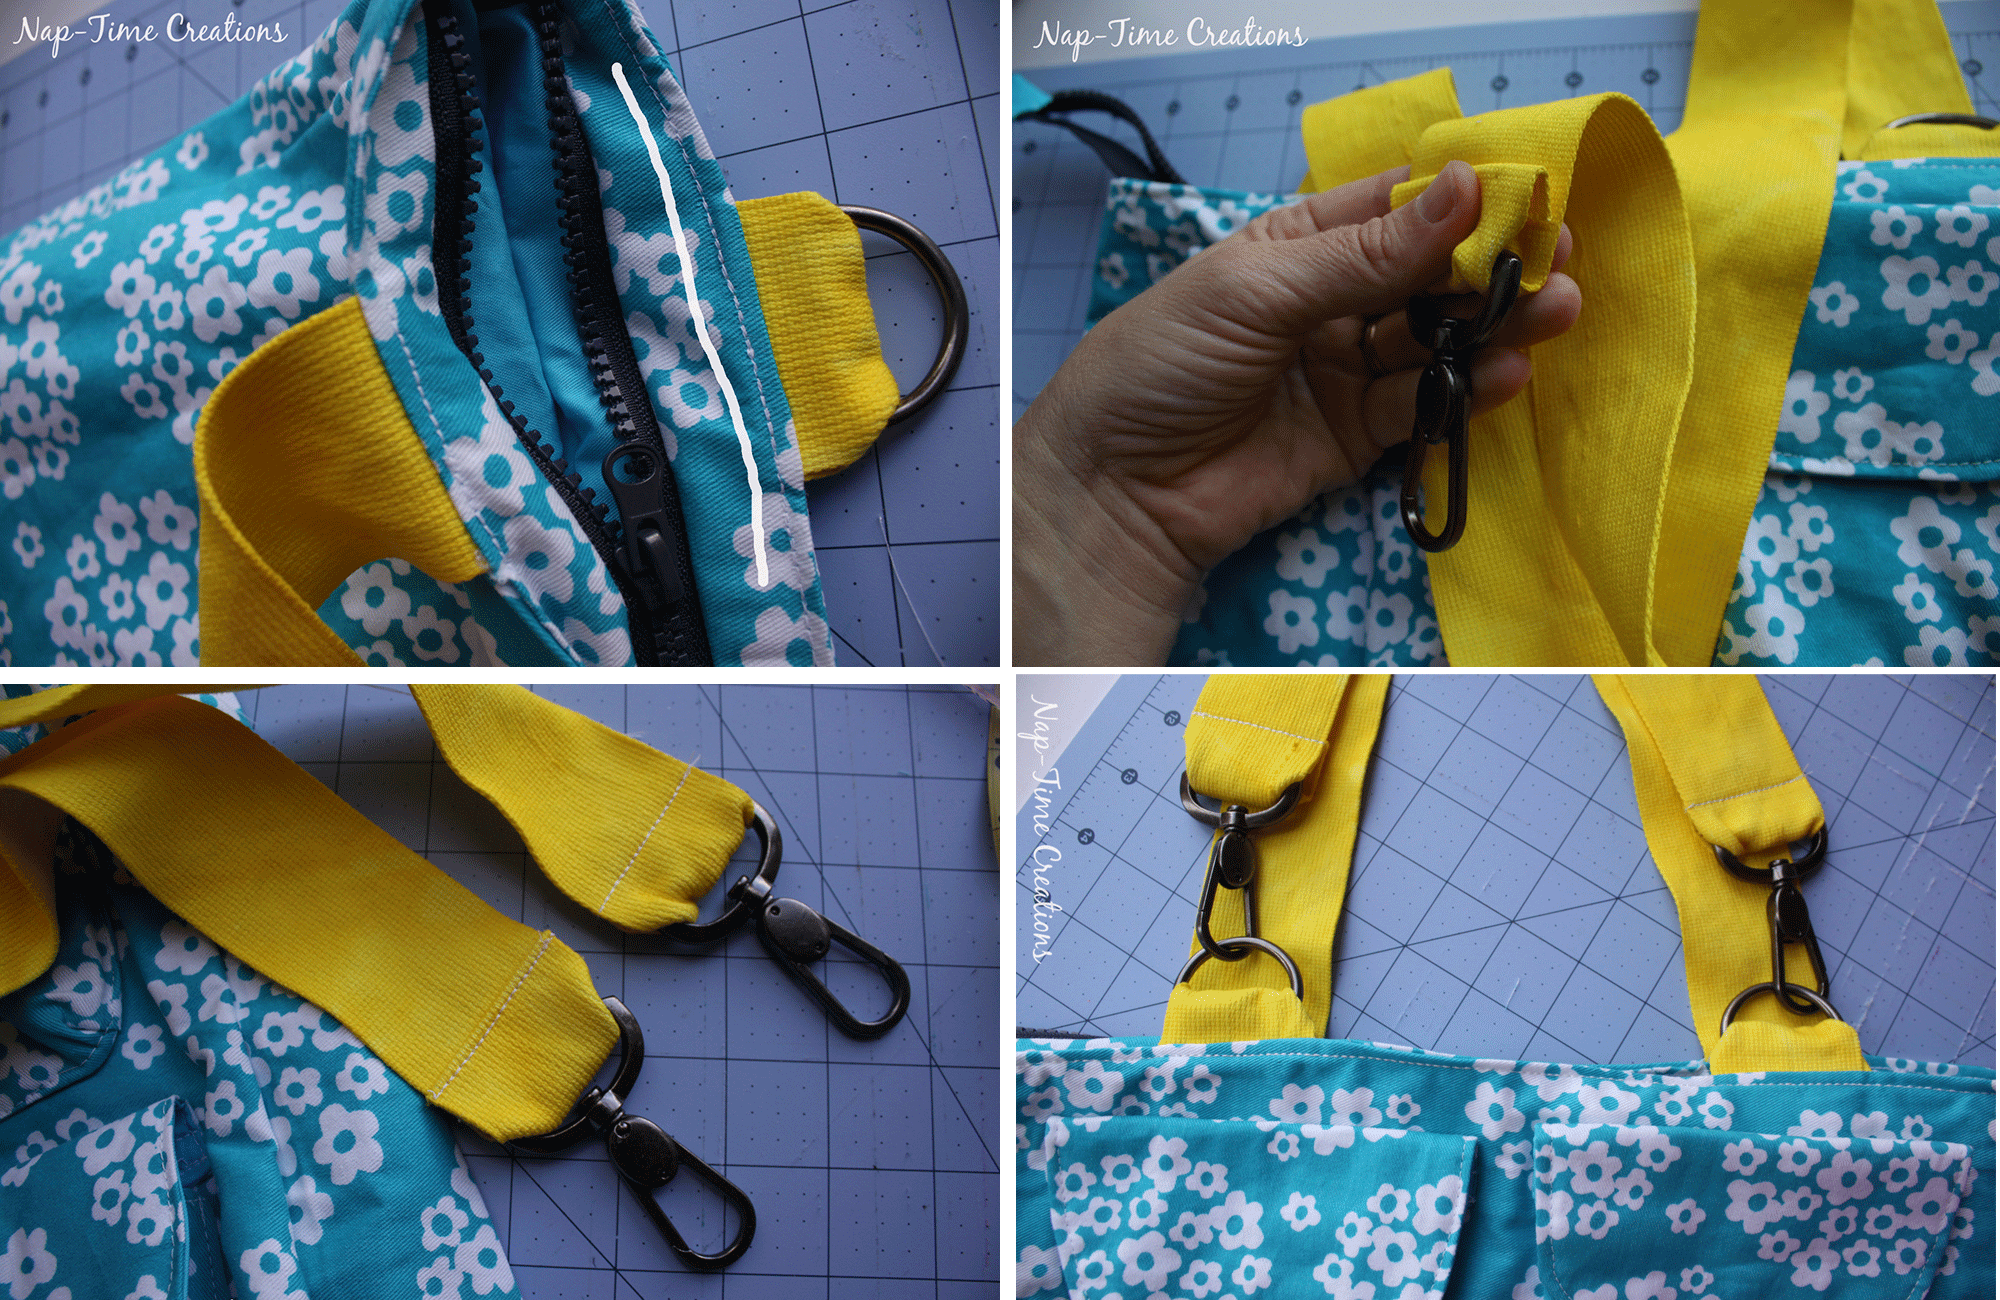
Here’s how I’m clipping the strap to the D ring for over the shoulder straps. I cross the straps for this back position to allow the back to hang on my shoulder. If you sewed this with buckles you just unbuckle and re buckle in the new position.
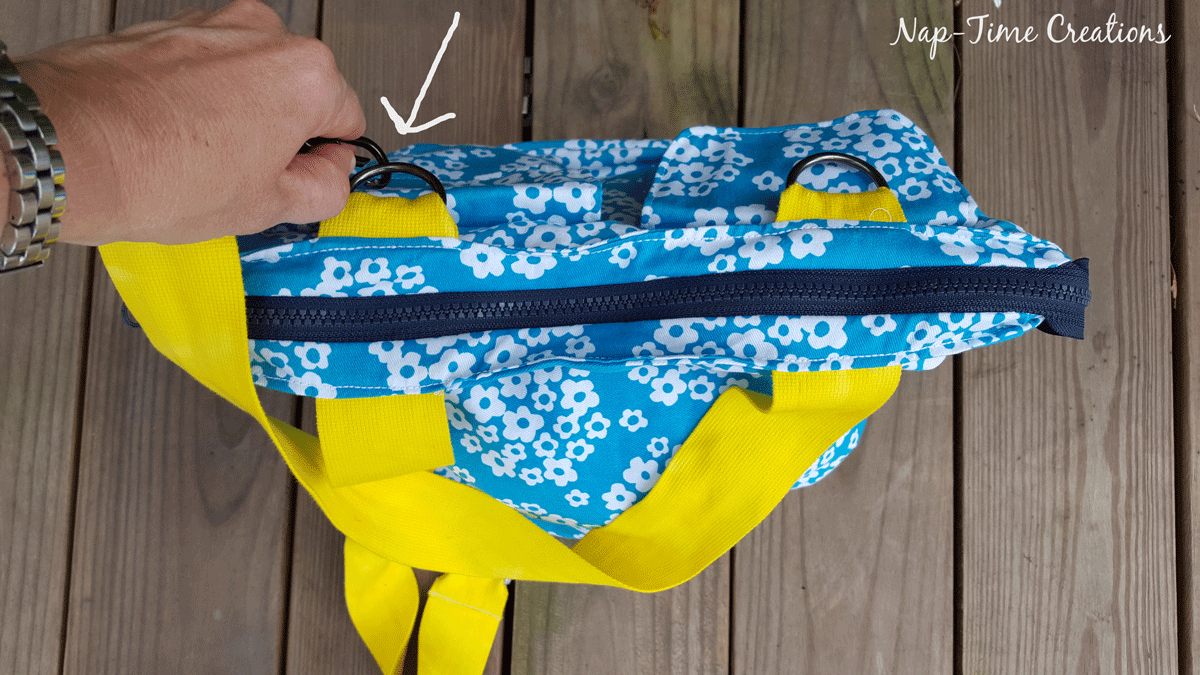
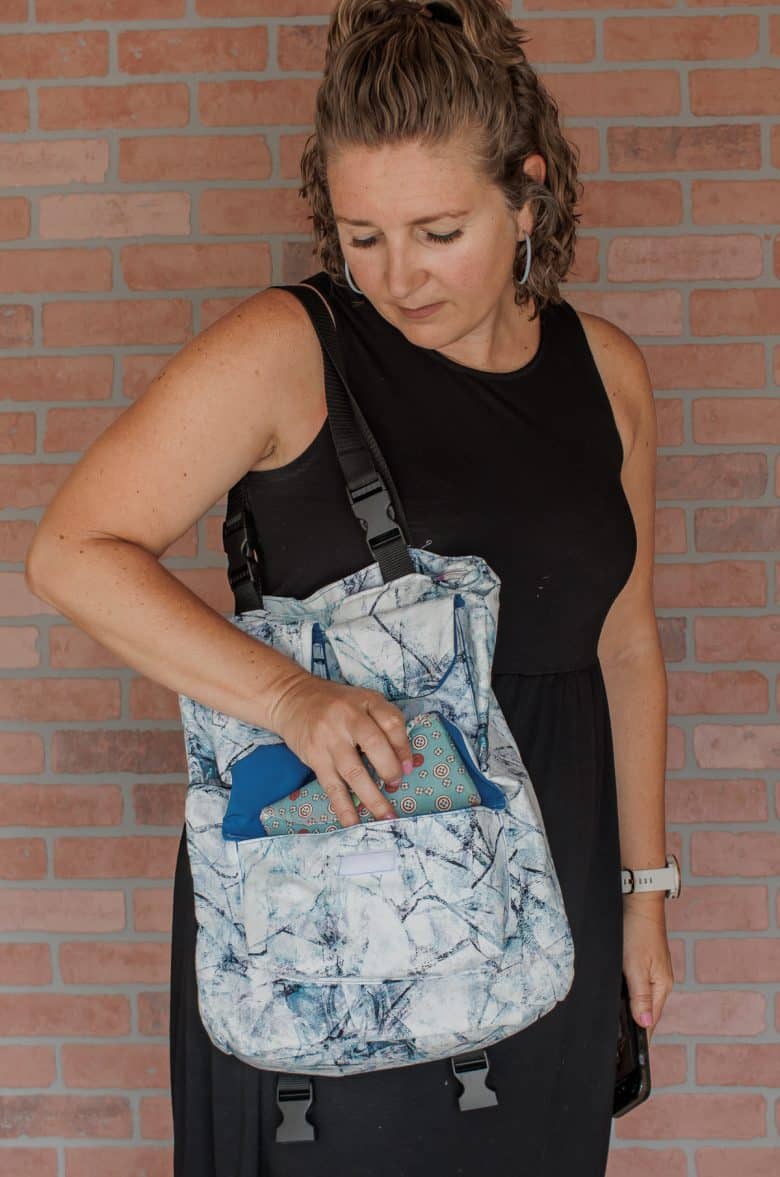
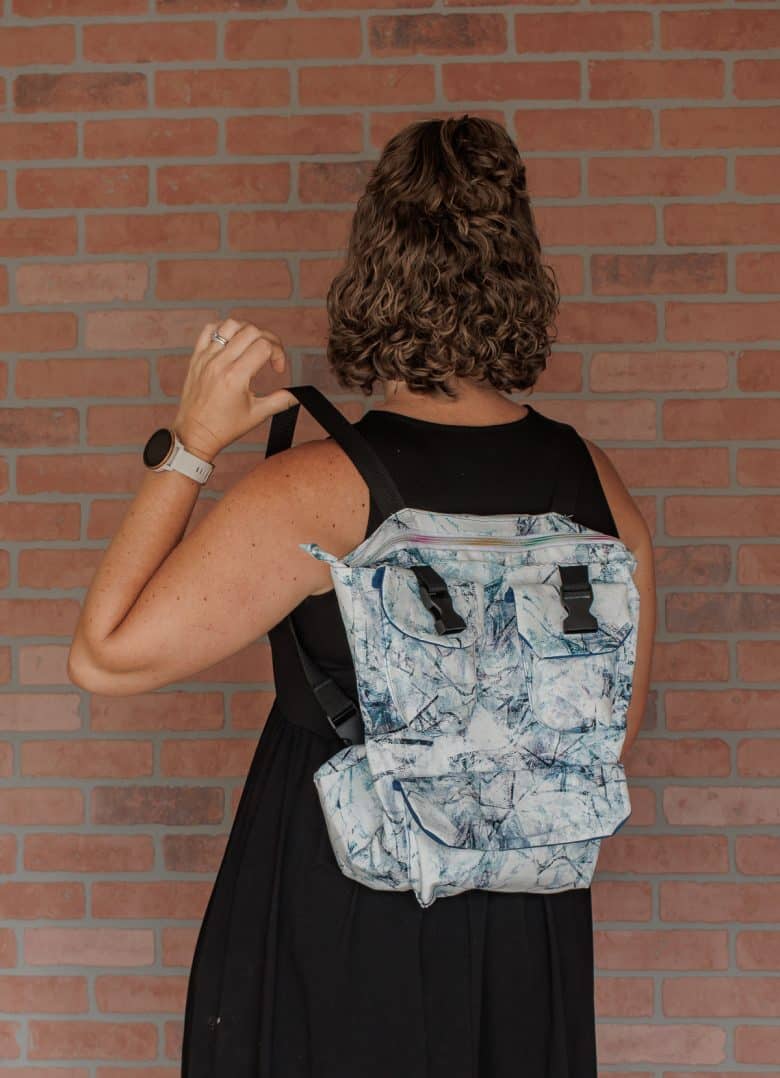
Then just un-clip and re-clip to the bottom straps and you can wear it on your back!
SO excited to share this with you this weekend! I hope you will enjoy making it as much as I did! Join my Facebook pattern group to show of your finished photos, or ask questions along the way.
More bag / purse patterns to try –
- Cross body Hip/shoulder bag
- Sling Bag
- Sling Backpack
- Wool Sack Purse
- Winter Purse
- Mesh Beach bag
- Convertible Bag/backpack pattern
- Small Faux leather purse pattern
- key fob wristlet
How to sew a convertible purse/backpack tutorial
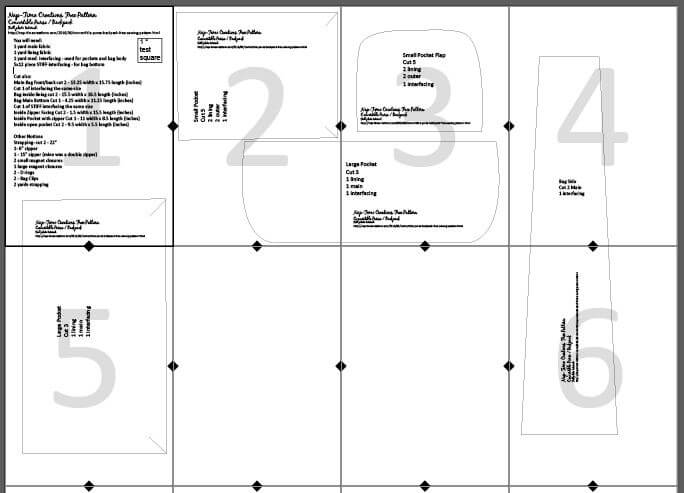
Okay, so this is the tutorial for the convertible purse / backpack free sewing pattern…Well, brace yourself!! This is a long tutorial, with tons of photos, but I wanted to make it super clear and the finished bag is SO worth it. Please let me know if you have questions about anything! Go download and print the pattern using the button below, then tape together. It should look something like this. You won’t have pages between 5 and 6.
NEW: Want to use a full video tutorial to sew every step of this bag? Use the button below to purchase the video tutorial for $3. This will give you access to a private YouTube video {with time markers for each step} So that you can watch the whole thing or skip to the steps you need.
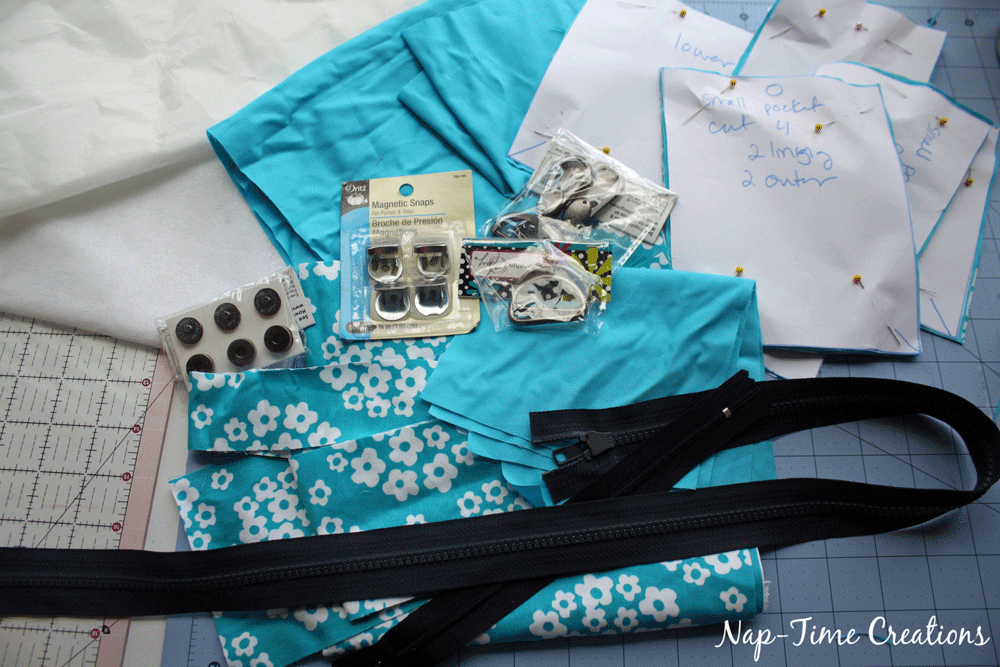
Here’s the pile of supplies I used. Also… I never buy all new supplies for a project so if you have something that you want to use that a little different, go for it! These are also listed on the printed pattern but here you go as well:
You will need:
- 1 yard main fabric {a thicker fabric like canvas, duck cloth, etc}
- 1 yard lining fabric { a thinner fabric}
- 1 yard med. iron-on interfacing – used for pockets and bag body {I don’t have the exact kind, just not too light or too stiff}
- 5×12 piece STIFF iron-on interfacing – for bag bottom
Other Notions
- Nylon Strapping- cut 2 – 22-30” cut the longer for longer backpack straps
- 1- 6” zipper
- 1 – 15” zipper {mine was a double zipper}
- 2 small magnet closures
- 1 large magnet closures
- OR Hook and Loop {velcro}
- 2 – D rings
- 2 – Bag Clips
- OR 4 Buckles
- 2 yards nylon strapping {1″ or 1.5″}
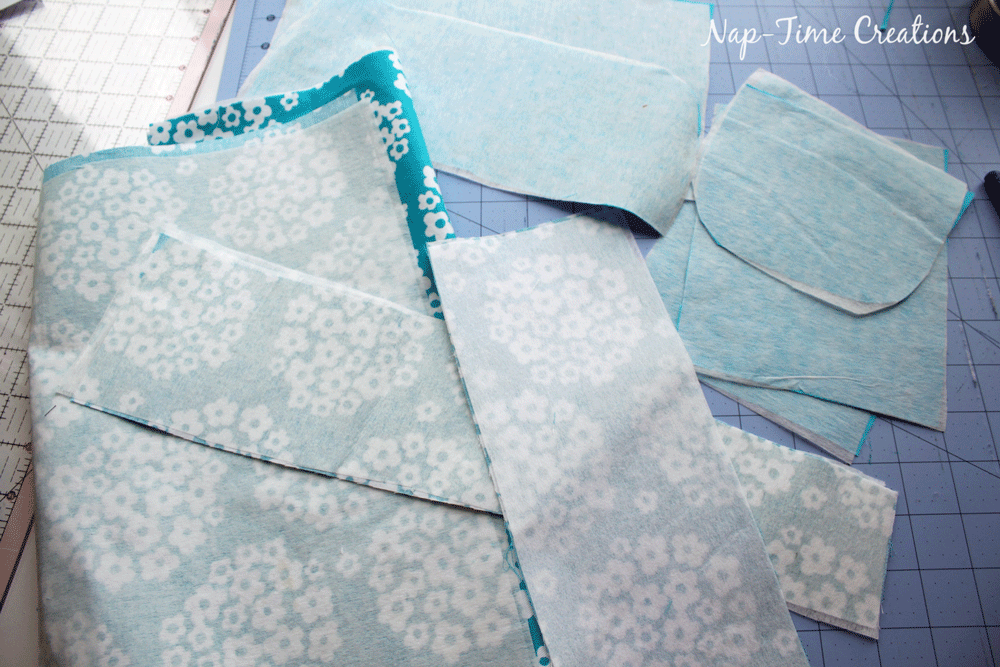
ALL seams are sewn with a 3/8 or less Seam Allowance…
Cut the pieces out and iron the interfacing to all the MAIN fabric pieces for the bag body and the lining for the pockets {although it doesn’t really matter for the pockets}
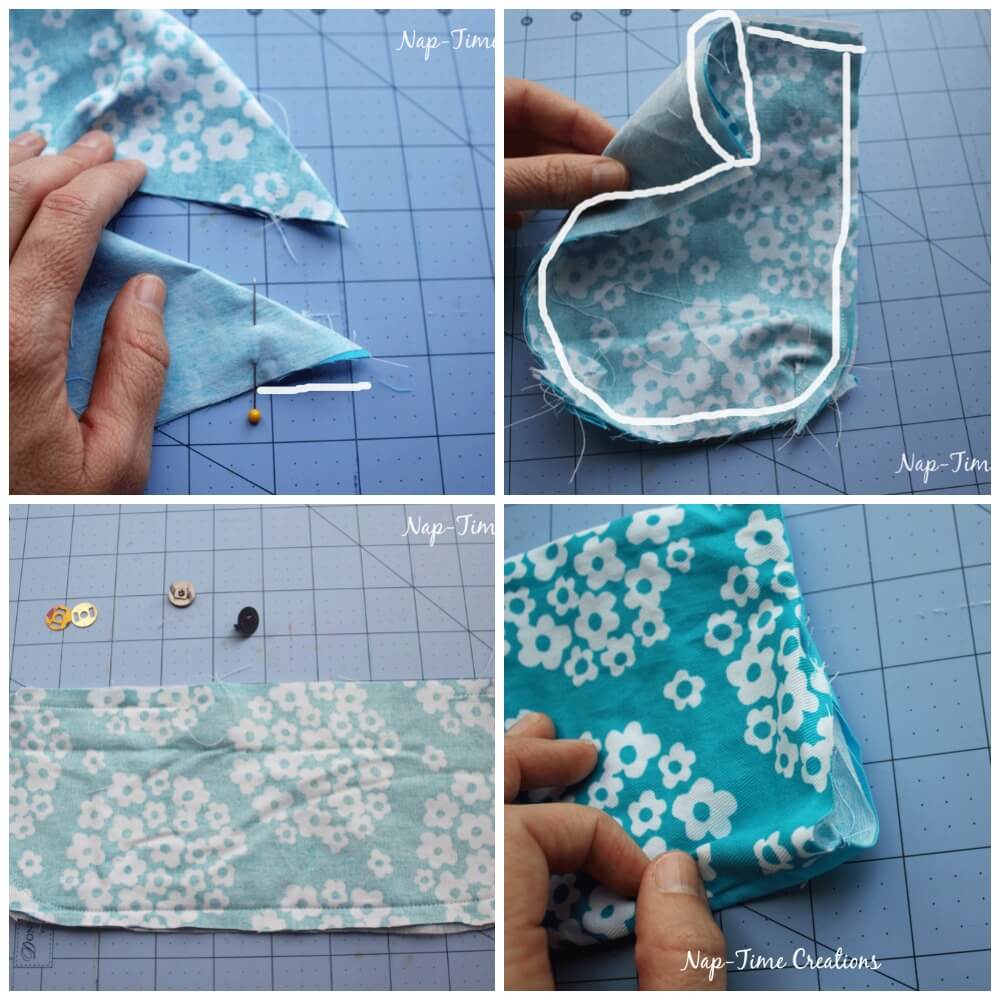
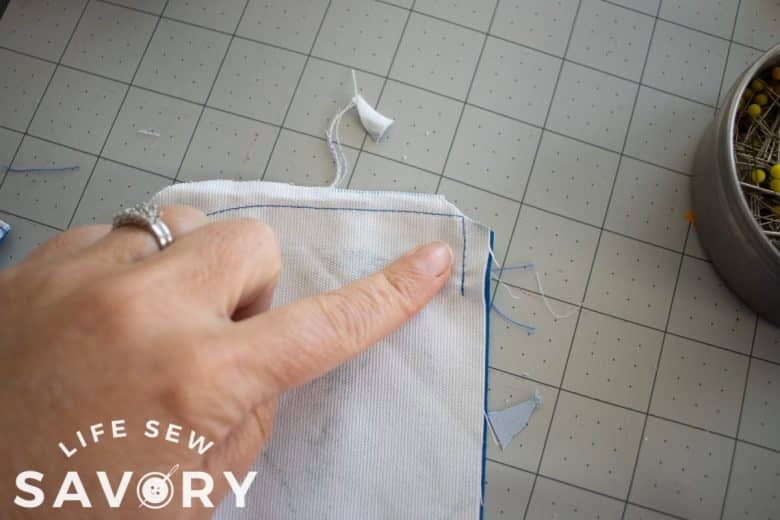
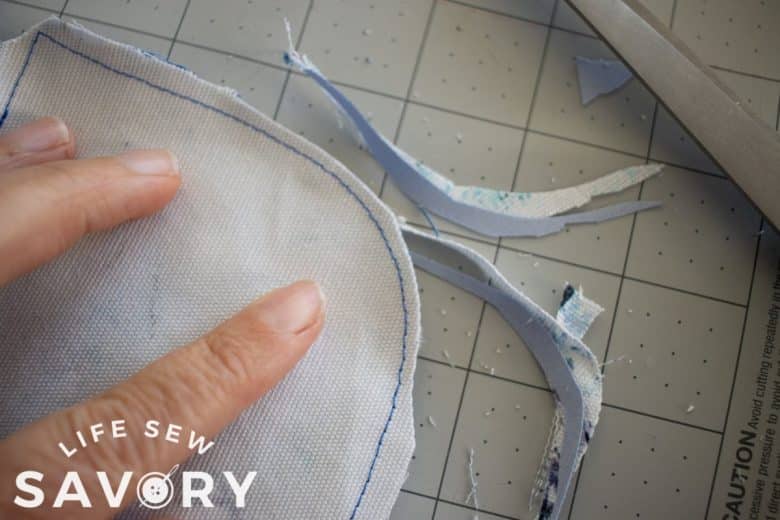
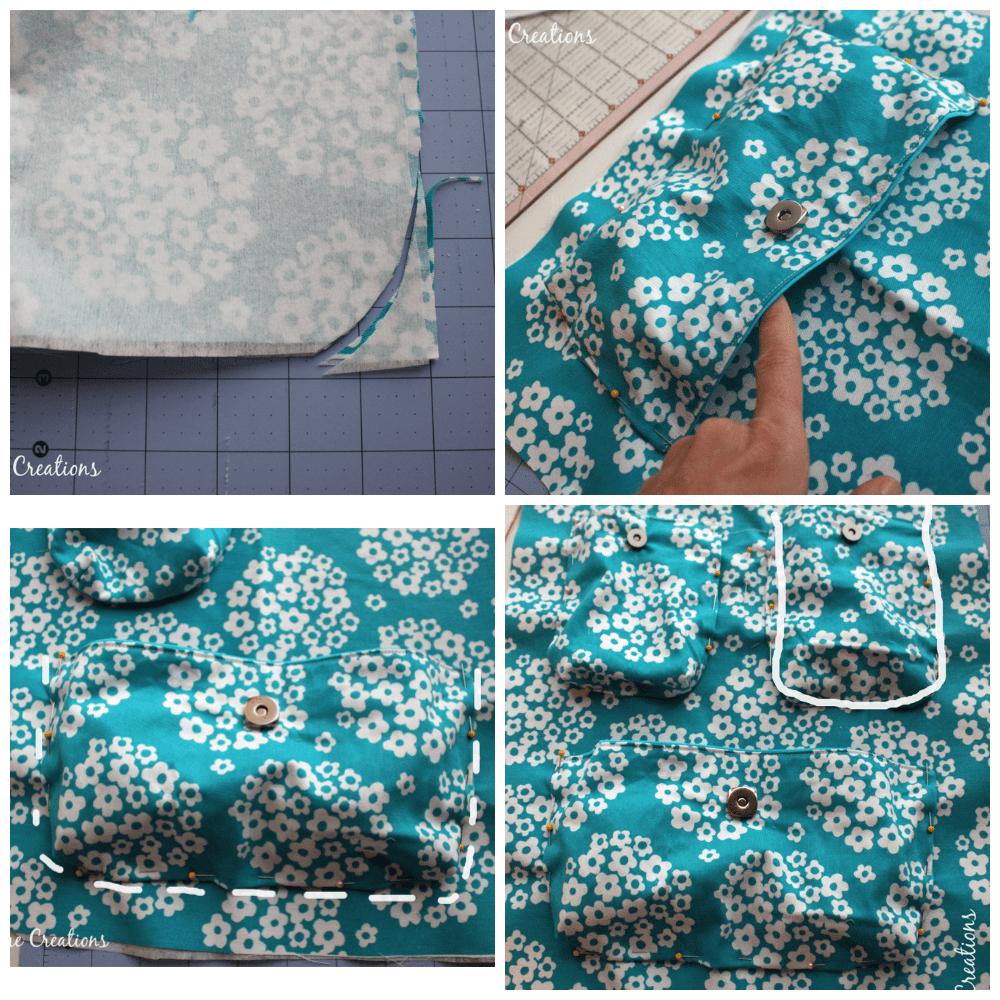
Start by shaping the outside bag pockets. Fold the bottom corners {marked on the pattern pieces} {right sides together} and pin about 1″. Sew straight down where my pin is in the first photo. Do for all three pockets and pocket linings. Place a pocket main and a pocket lining together {right sides} and sew. Leave an opening as show in the 2nd photo. You will curve the bottom corners. Prepare the magnet closures. The 2 small for the top pockets and the larger 1 for the bottom.
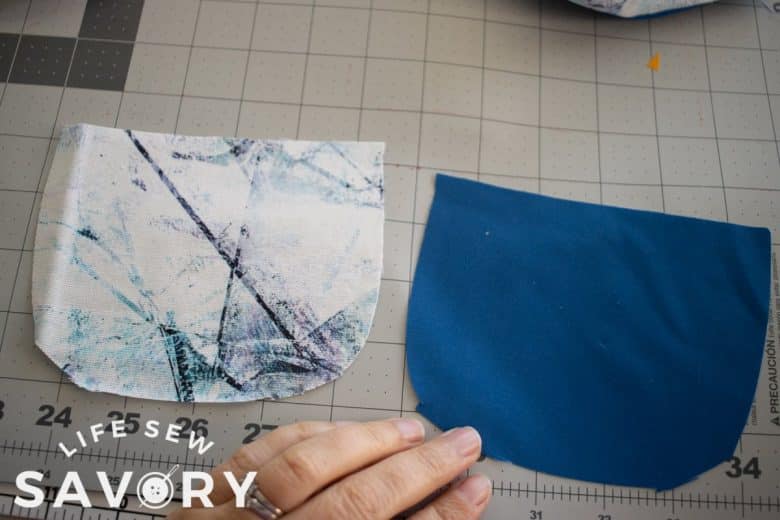
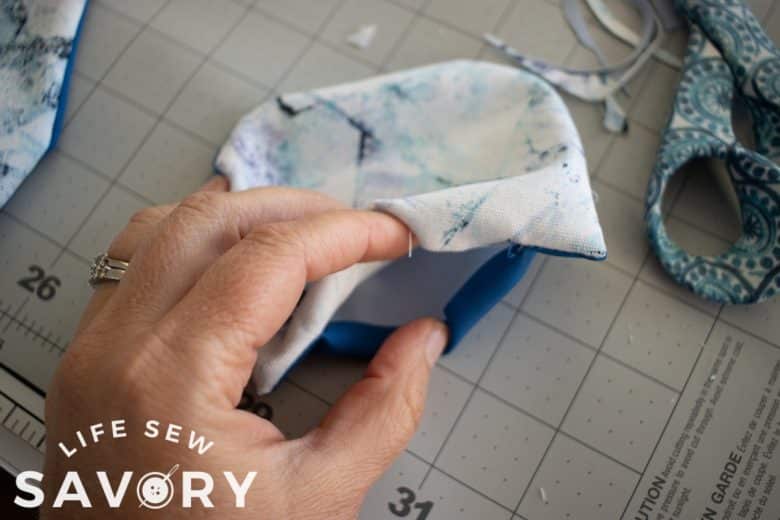
Sew the pocket flap lining and main together with right sides touching. Leave an opening for turning. Clip the corners and seam allowance.
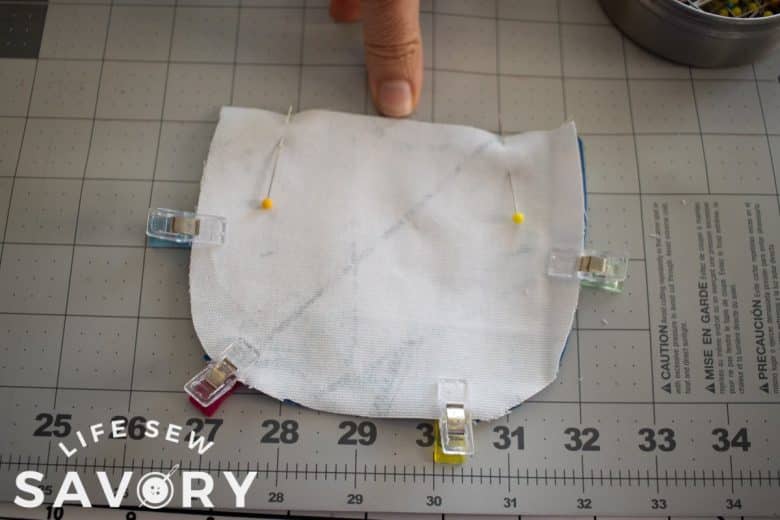
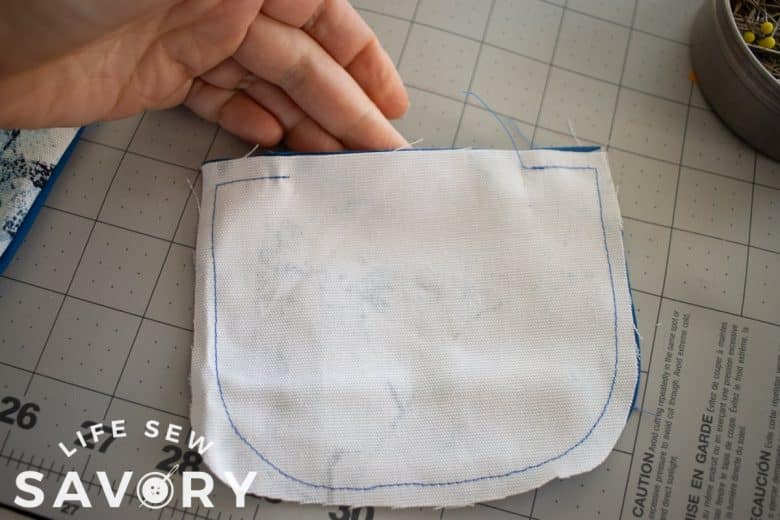
Turn open. If adding a magnetic clasp add it now before before closing the hole.
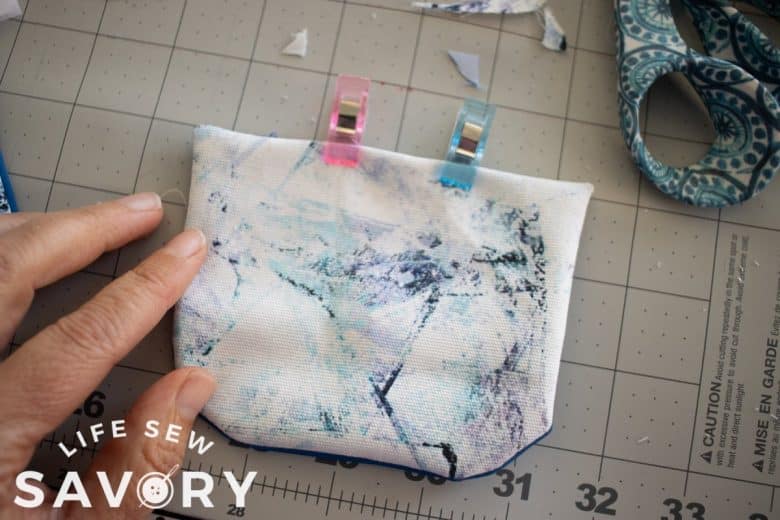
Fold the seam allowance in for the turning hole and then top-stitch the top edge of the pocket.
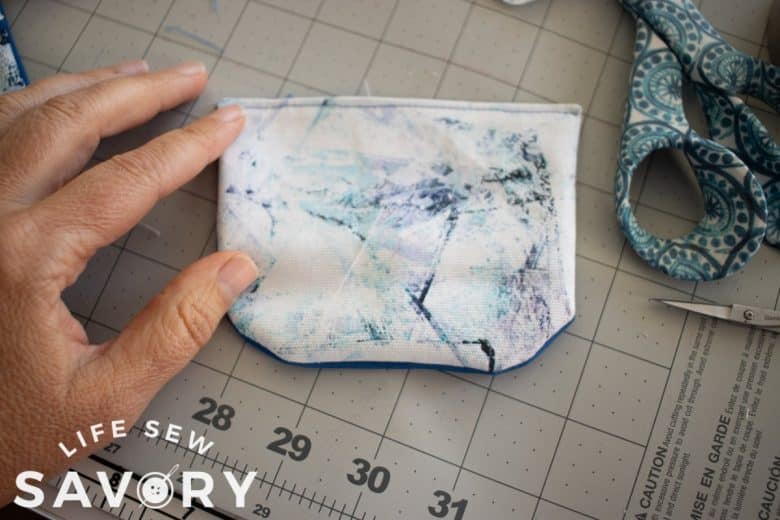
Adding velcro closure
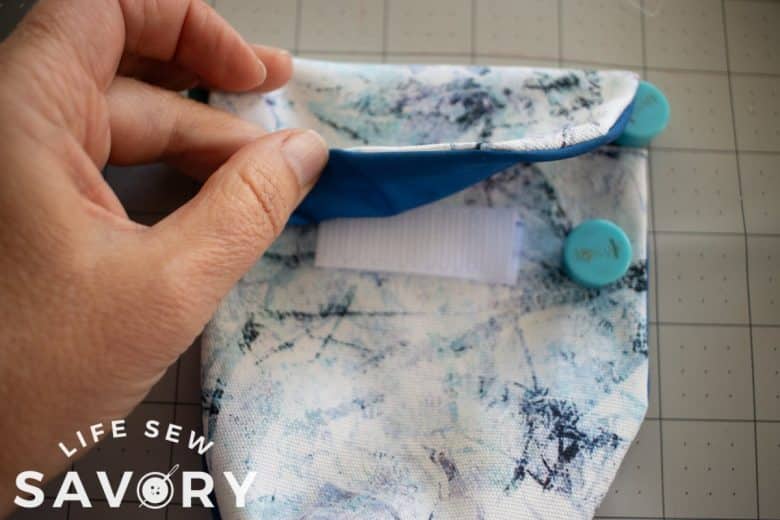
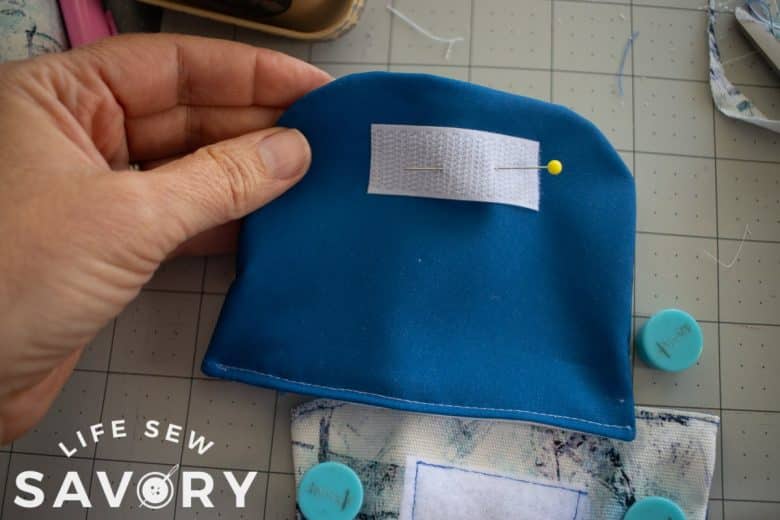
Sew a 2″ piece of velcro on the pocket, 1″ from the top edge. Sew the closure in the center. Place the flap at the top of the pocket, use your thumb or a weight to hold down the 1/2″ of the flap. Fold the flap over. Mark exactly where the velcro lines up and then pin in place on the flap.
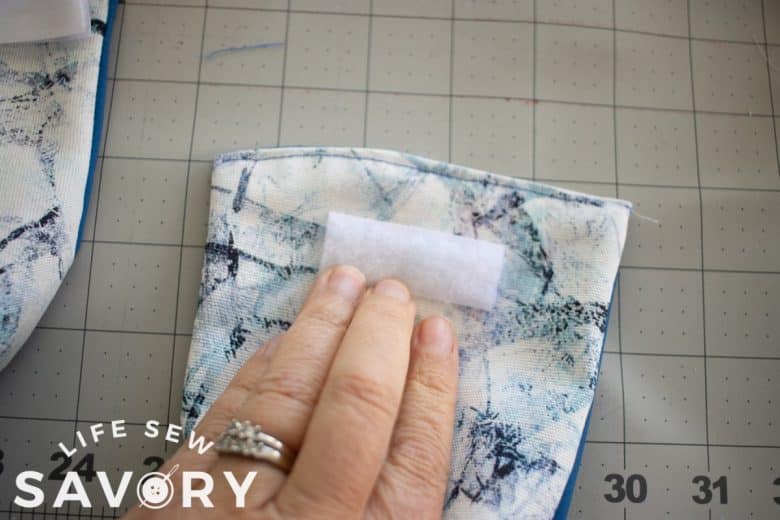
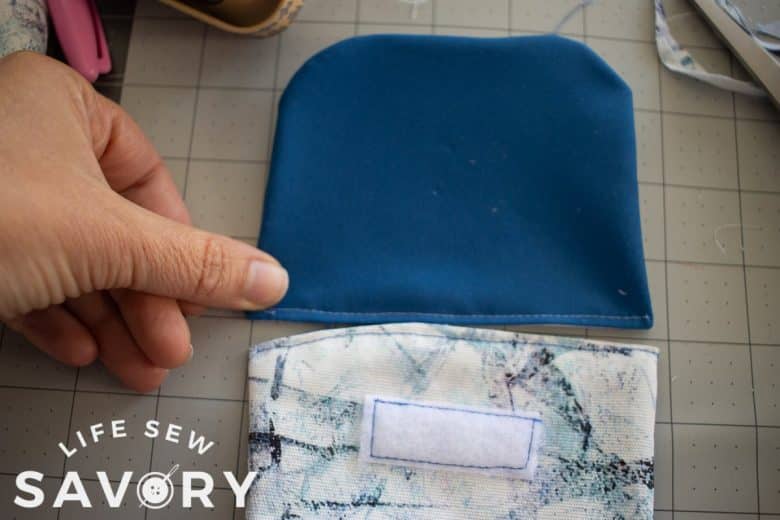
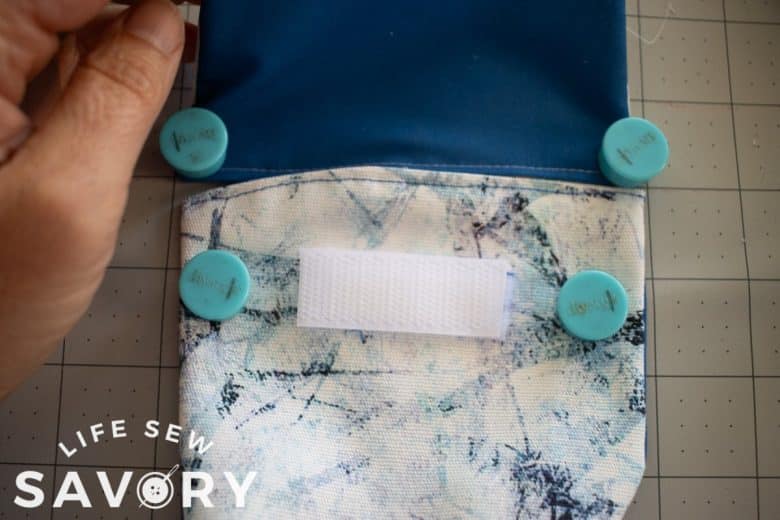
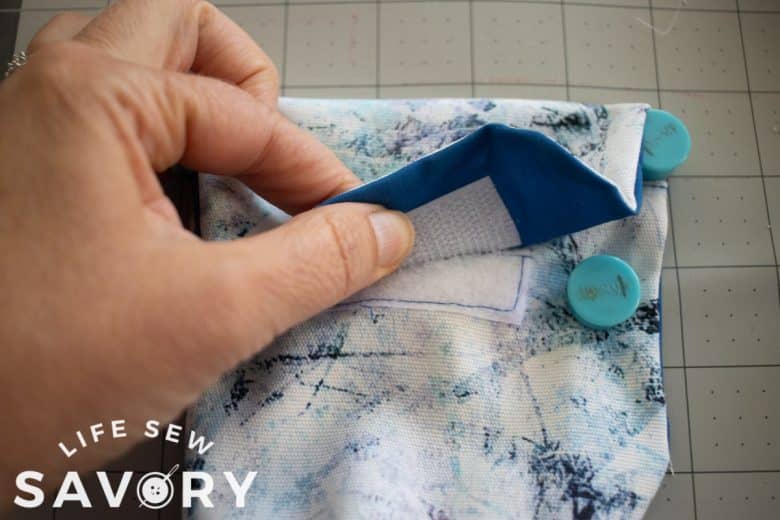
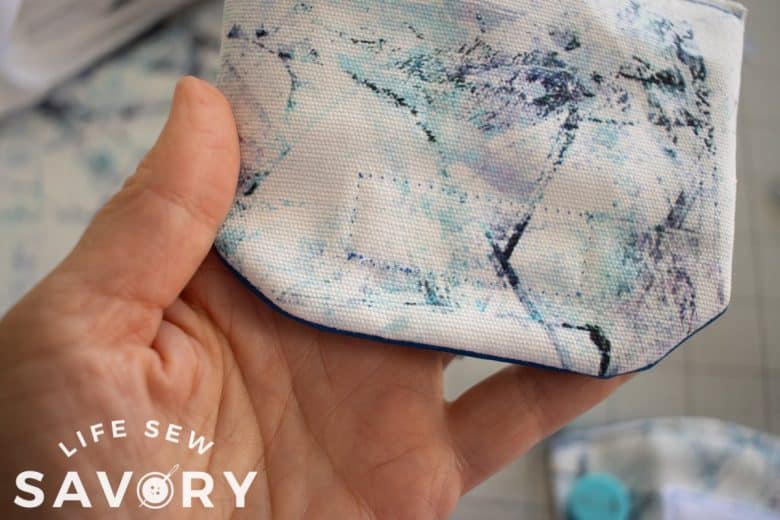
Stith the velcro in place. Make sure to use a thread that won’t show too much on the outside of the flap.
Adding magnetic clasp closure
ADD MAGNETIC CLOSURES BEFORE CLOSING TURINING HOLES.
Turn the pocket right side out, but before you sew the opening closed, attach the magnet to the OUTSIDE center of the pocket with the back of the magnet being inside the two layers. I placed my magnet about 1″ down from the top of pocket. The magnet on the flap should be only on the lining. You can reinforce the clasp with some interfacing if you think the fabric needs. Top-stitch the top of each pocket to close the opening. Repeat with the other two pockets.
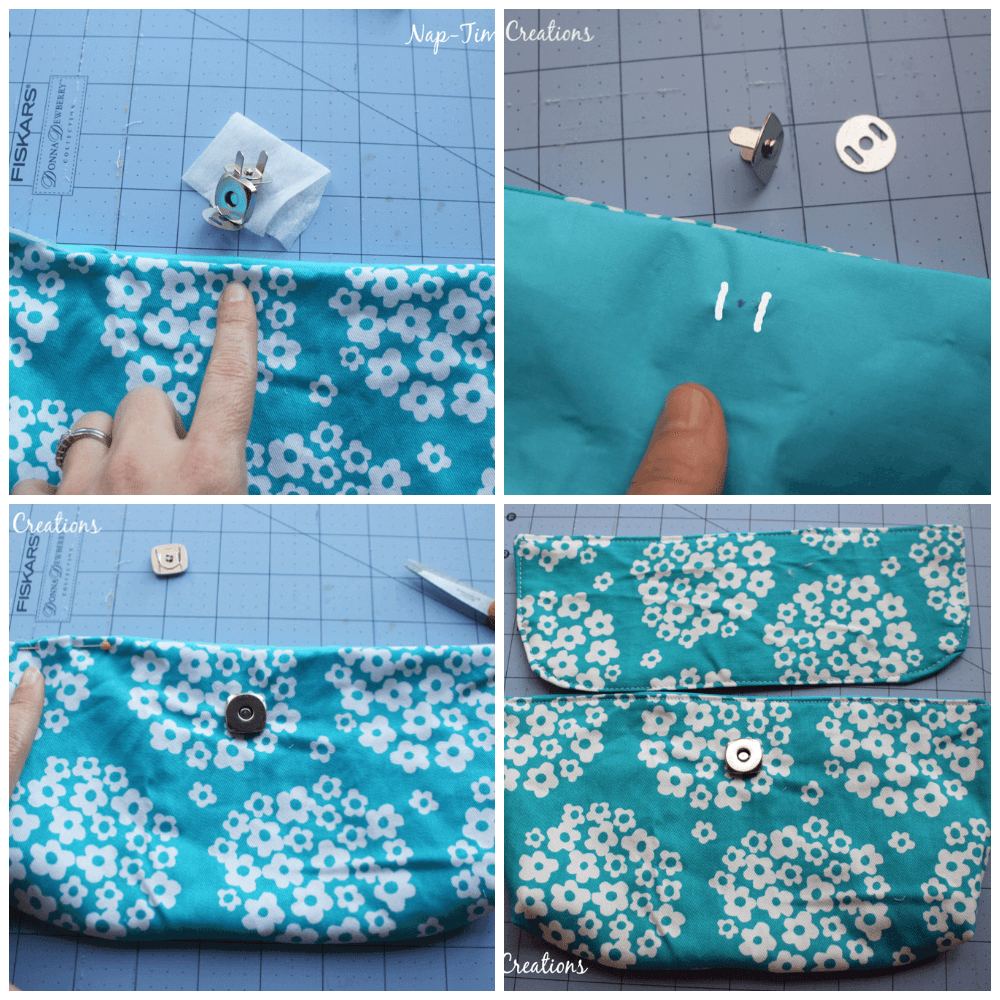
Line up the flap and pocket. Pinch at 1/2″ {my thumb} and fold over. This is the same method as shown above for the velcro instructions. Find out where the clasp will line up and mark it. Install the clasp through the opening. Top-stitch the flat edge of the pocket closed. The bottom right photo shows how the bottom pocket corners are rounded.
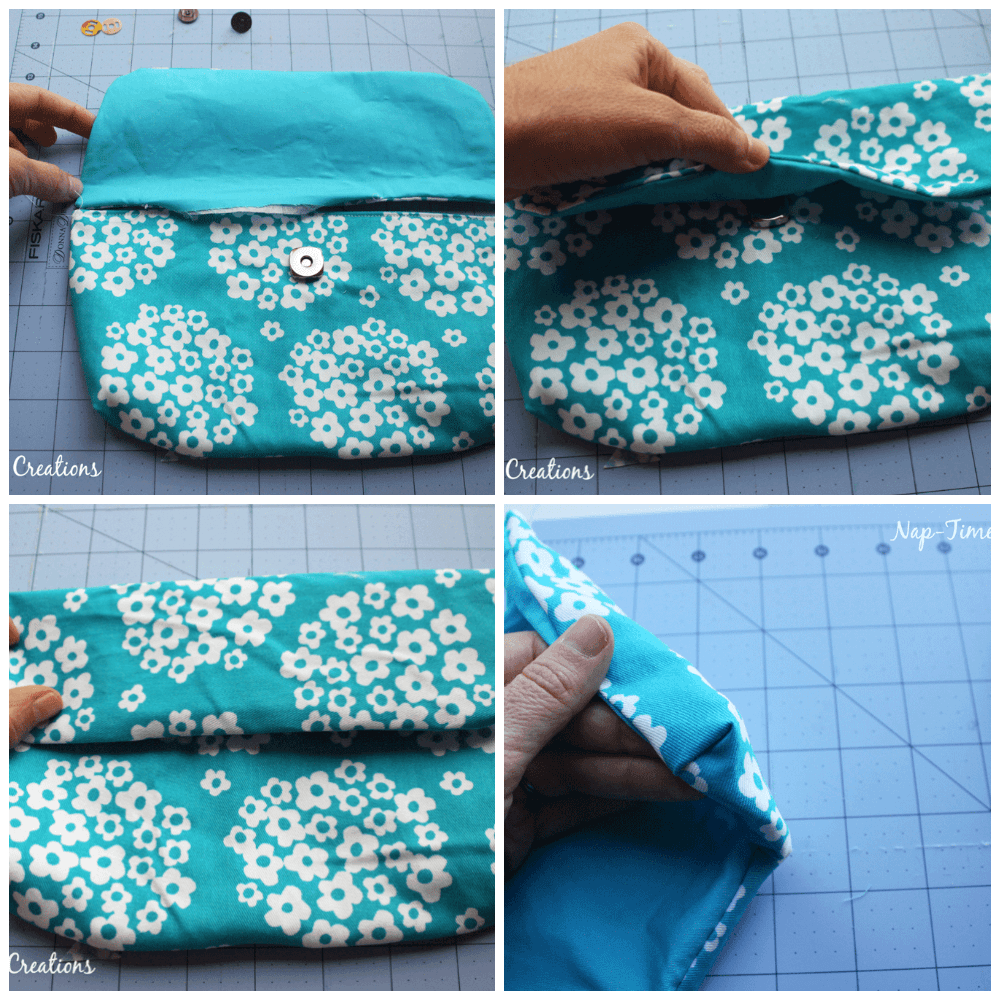
How to sew outside pockets on backpack
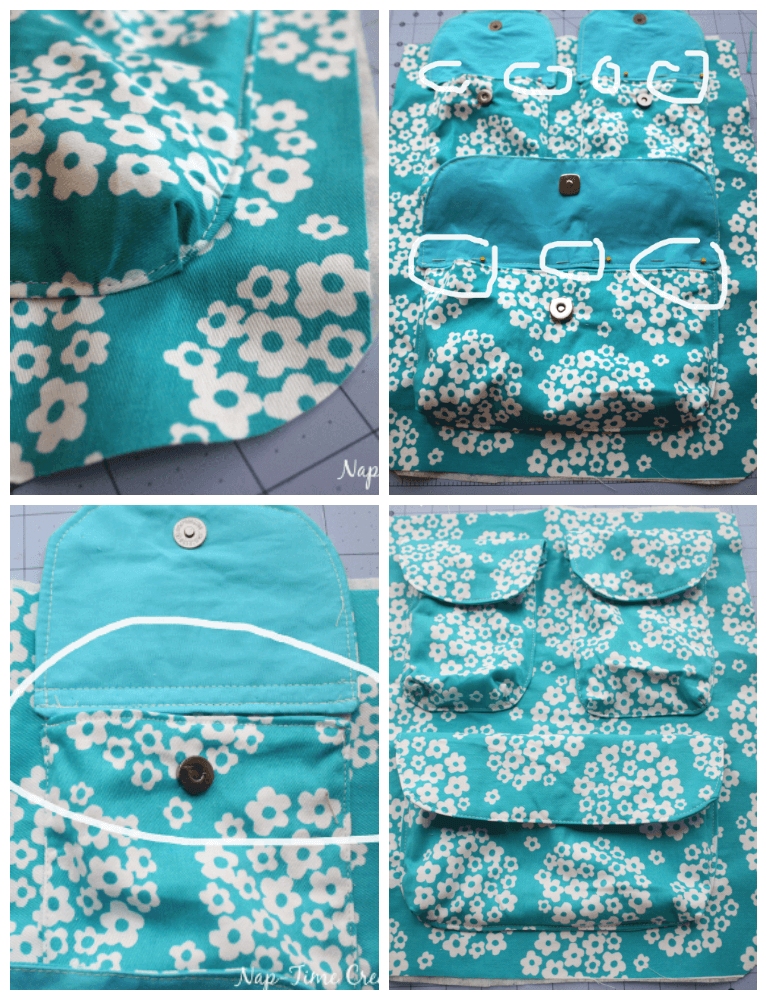
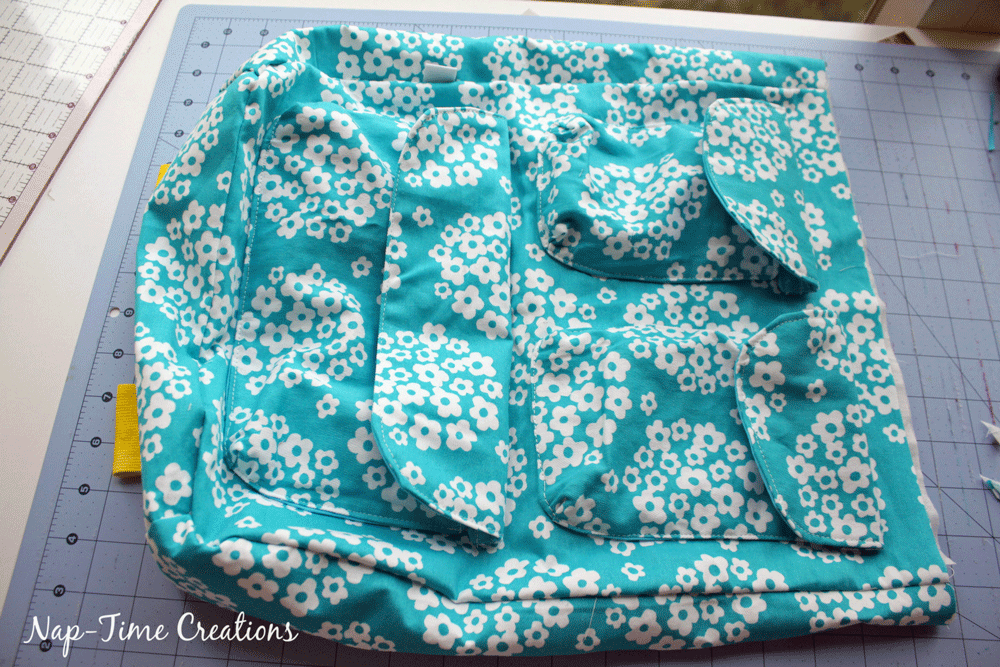
Take Main bag front/back and create curved bottom corners. You can see my curve. Pin the bottom pocket 2″ from the bottom of the bag. The top of the pocket will not be flat on the bag. It should be open and loose, pin the sides of the pocket straight up from the or just slightly from the curved bottom. Pin the top two pockets another 2″ up from the bottom pocket. Pin all pockets and make sure they are centered /aligned on bag. Sew around the sides and bottom of pockets. You will curve the bottom corners. Sew close to the edge, catching both layers of pocket.
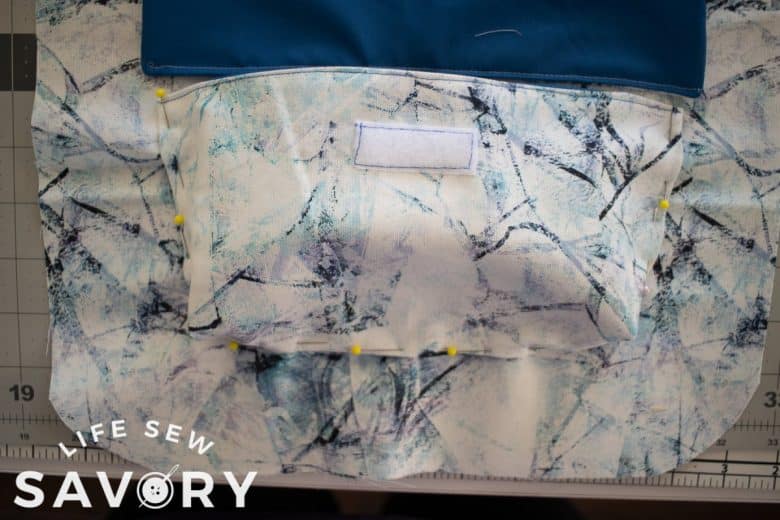
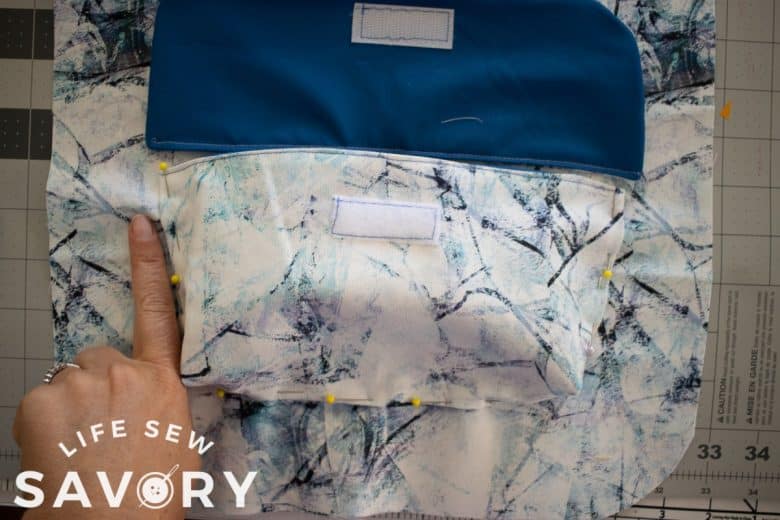
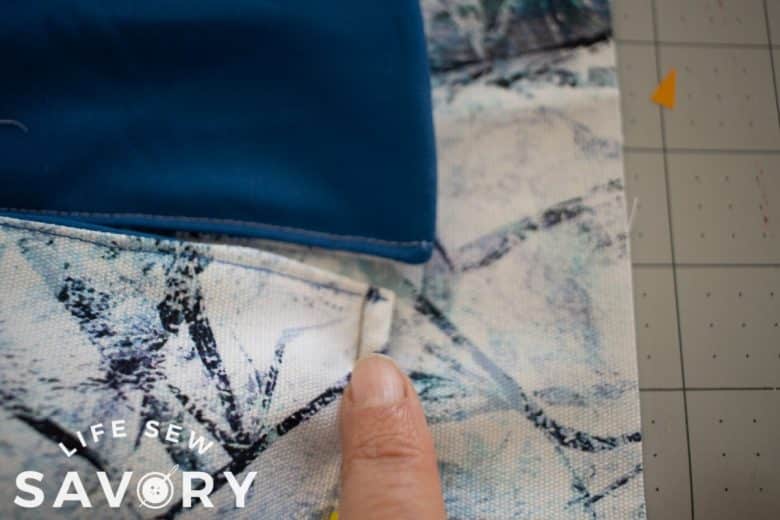
Before sewing the pocket in place, make sure the flap will line up with the edges. There should be no more than 1/4″ of the flap extending out from the pocket edges. You may need to spread of the sides of the pocket just a bit.

Pin the pocket flaps right above the pocket. You will sew the very edge of the pocket, then another line 3/8″ from the first. Sew other pockets too. Outside pockets are now complete.
Take the Main bag side and bottom. Sew the wider short end of the side to the short side of the bottom. Repeat with the other side. You now have the side and bottom together in a long piece. Pin and sew the sides and bottom to the bag front. You may have a bit extra from the side piece to trim. I added my tag in this seam as well. Before you sew the back to the sides cut 2-3″ pieces of the strap. Fold in half and pin 2″ from the side of the bag on the bag bottom. . They will be pointed towards the bag side as shown. Stitch in place… Pin and sew the back of the bag to the bag sides. NOTE: you can add D rings to the straps here for easy clipping, but I didn’t want them hanging off the bottom of my bag, swinging around… personal preference} BUCKLES: if adding the buckle option, loop buckle through strap before pinning/sewing in place.
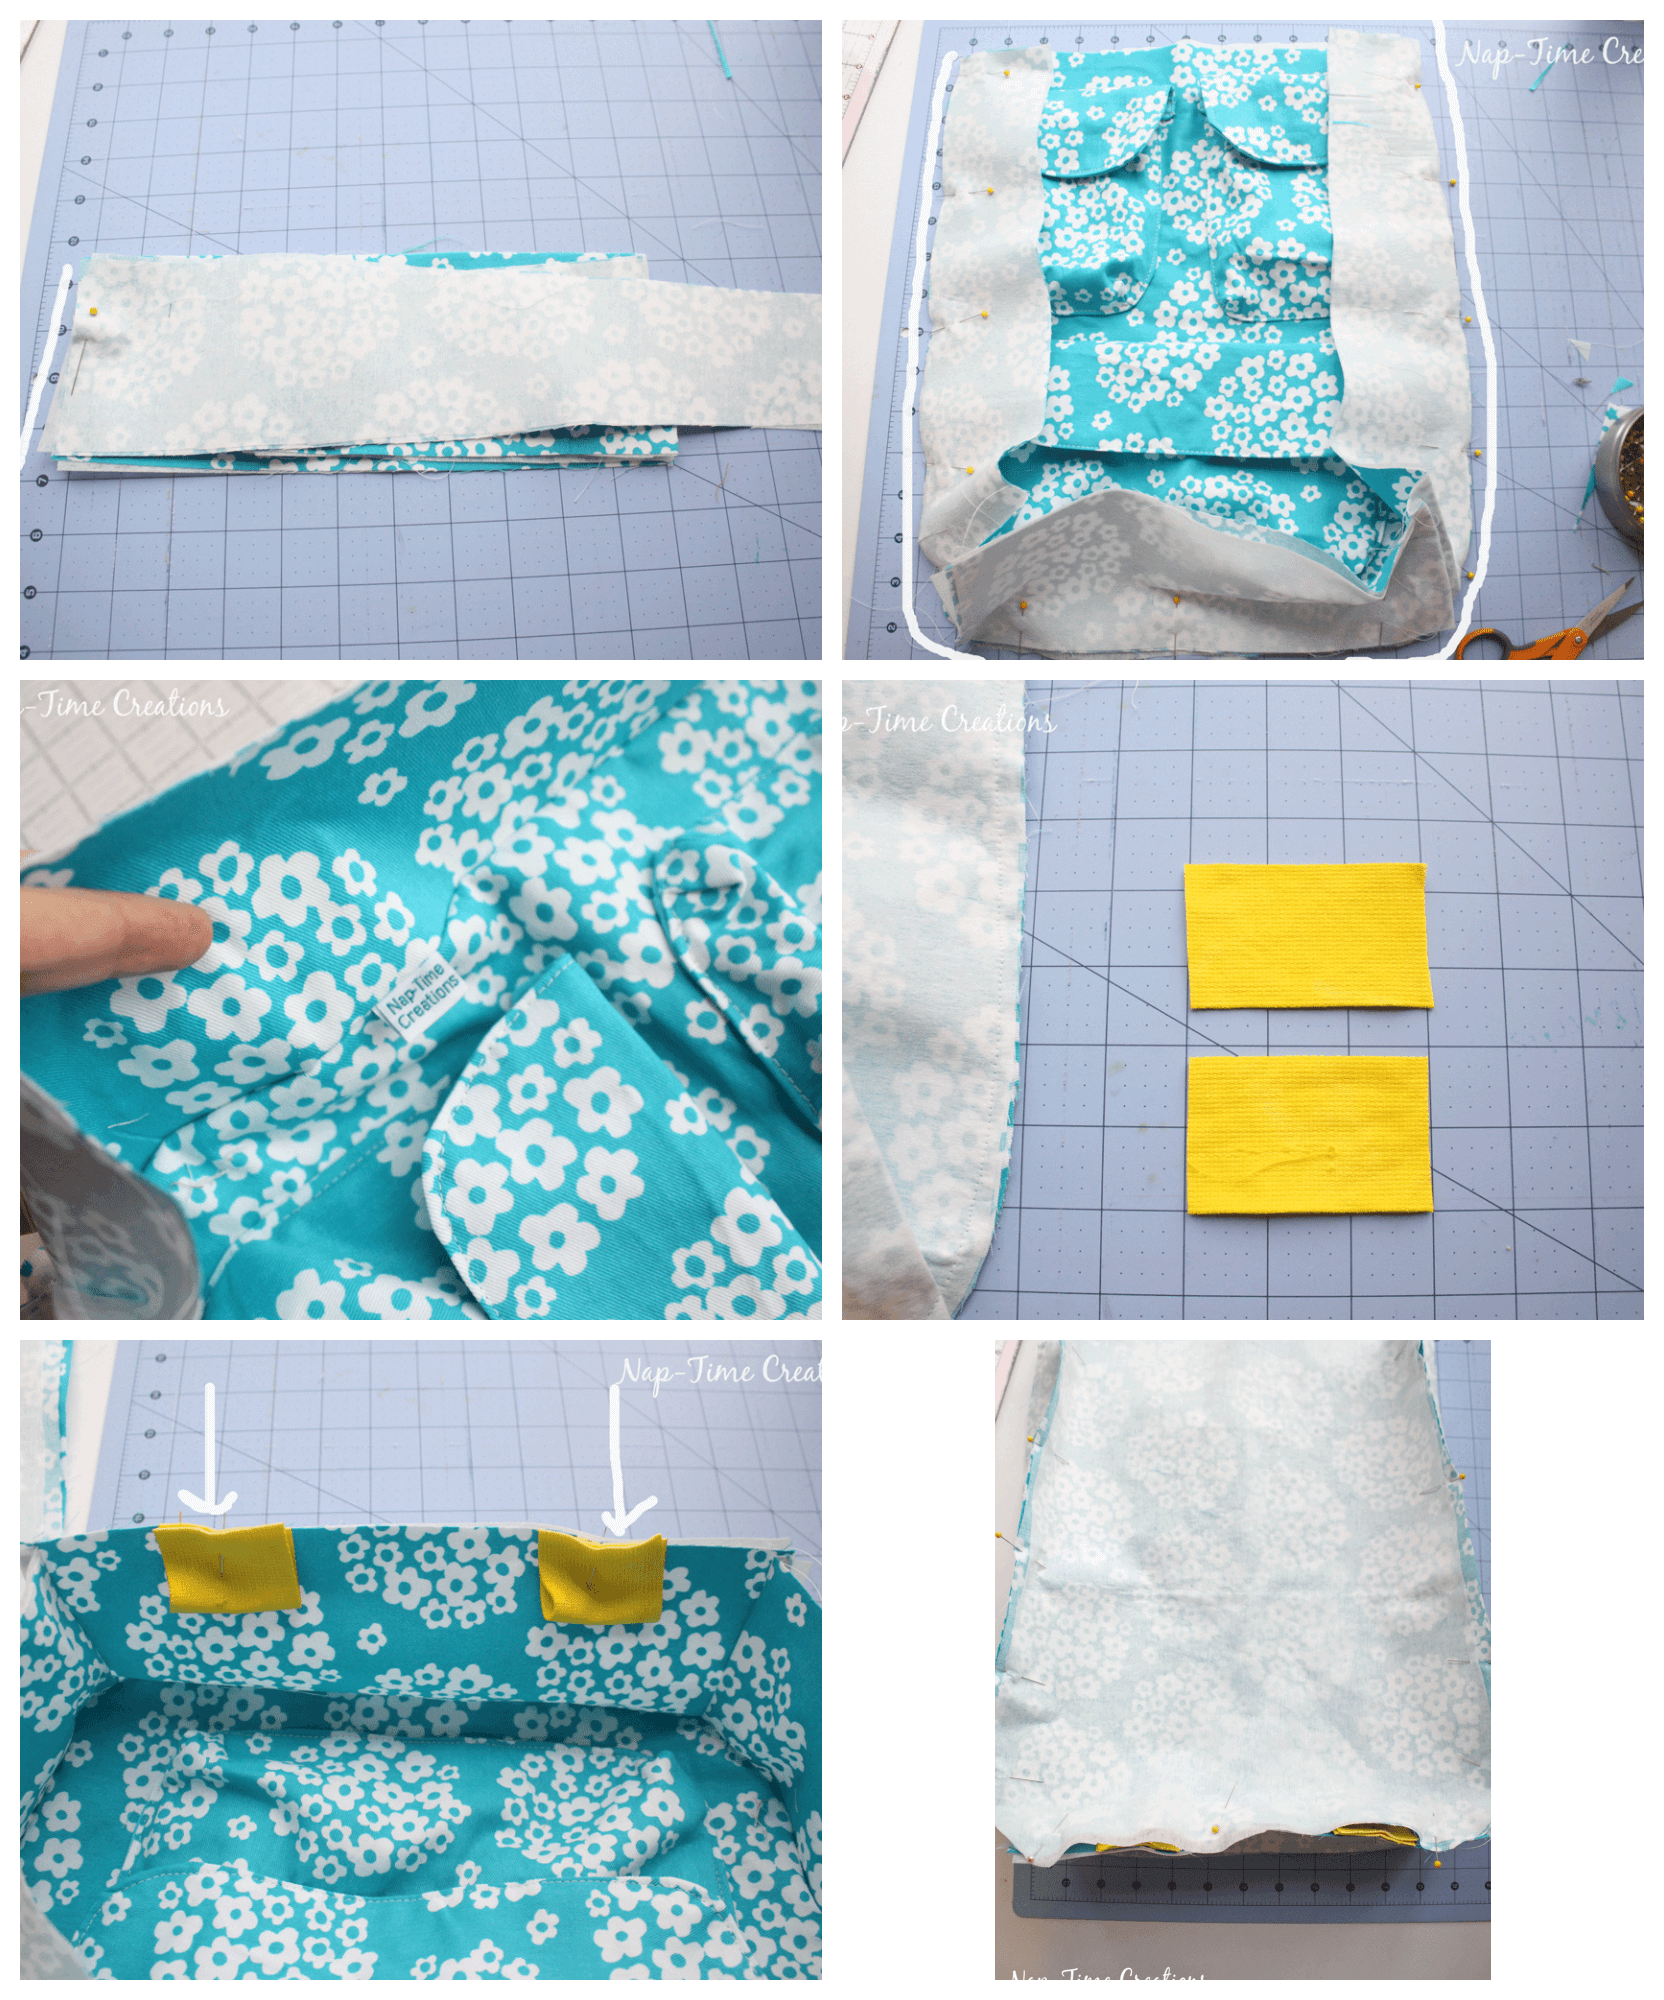
You now have a completed outside bag shell.
Instructions for inside pockets
On to the inside pockets. We will start with the zipper pockets. Lay the pocket piece on right side of the bag inside. Position the top of the pocket about 3″ down from the top. Mark the ends of your zipper teeth and then draw parallel lines creating a rectangle 1/2″ tall. Sew around this rectangle on the lines. Clip the center and corners of the center. Pull the pocket piece throw to the back of the bag side. Press. Lay your closed zipper over the opening and pin. The pull tab should be right at one end.
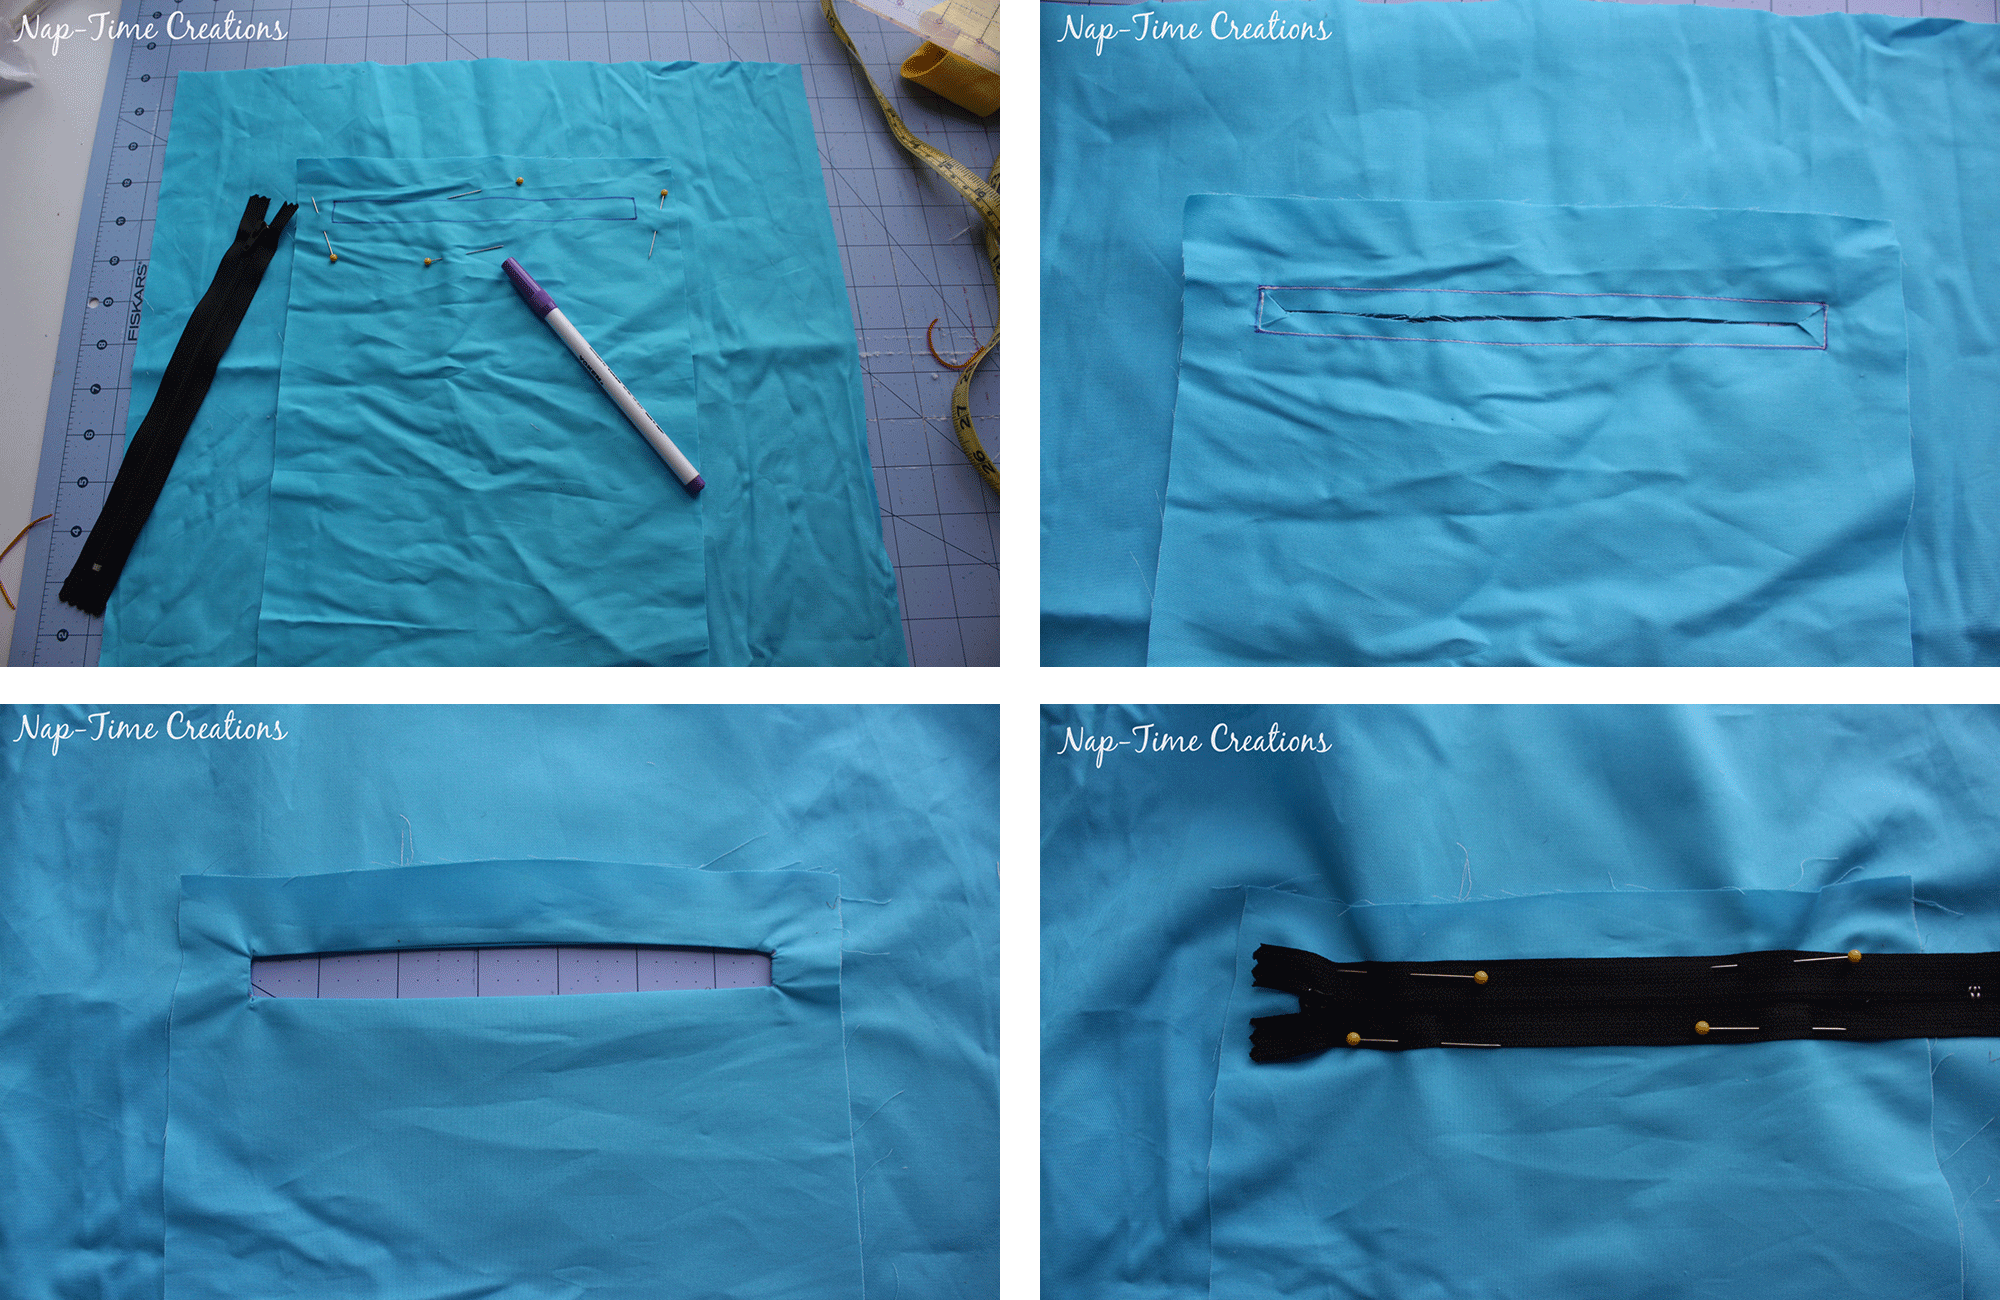
Sew around to attach the zipper to the pocket. On the wrong side, fold the pocket piece up and in half, enclosing the zipper and creating the pocket. Sew around the sides and top. You now have a zipper pocket.
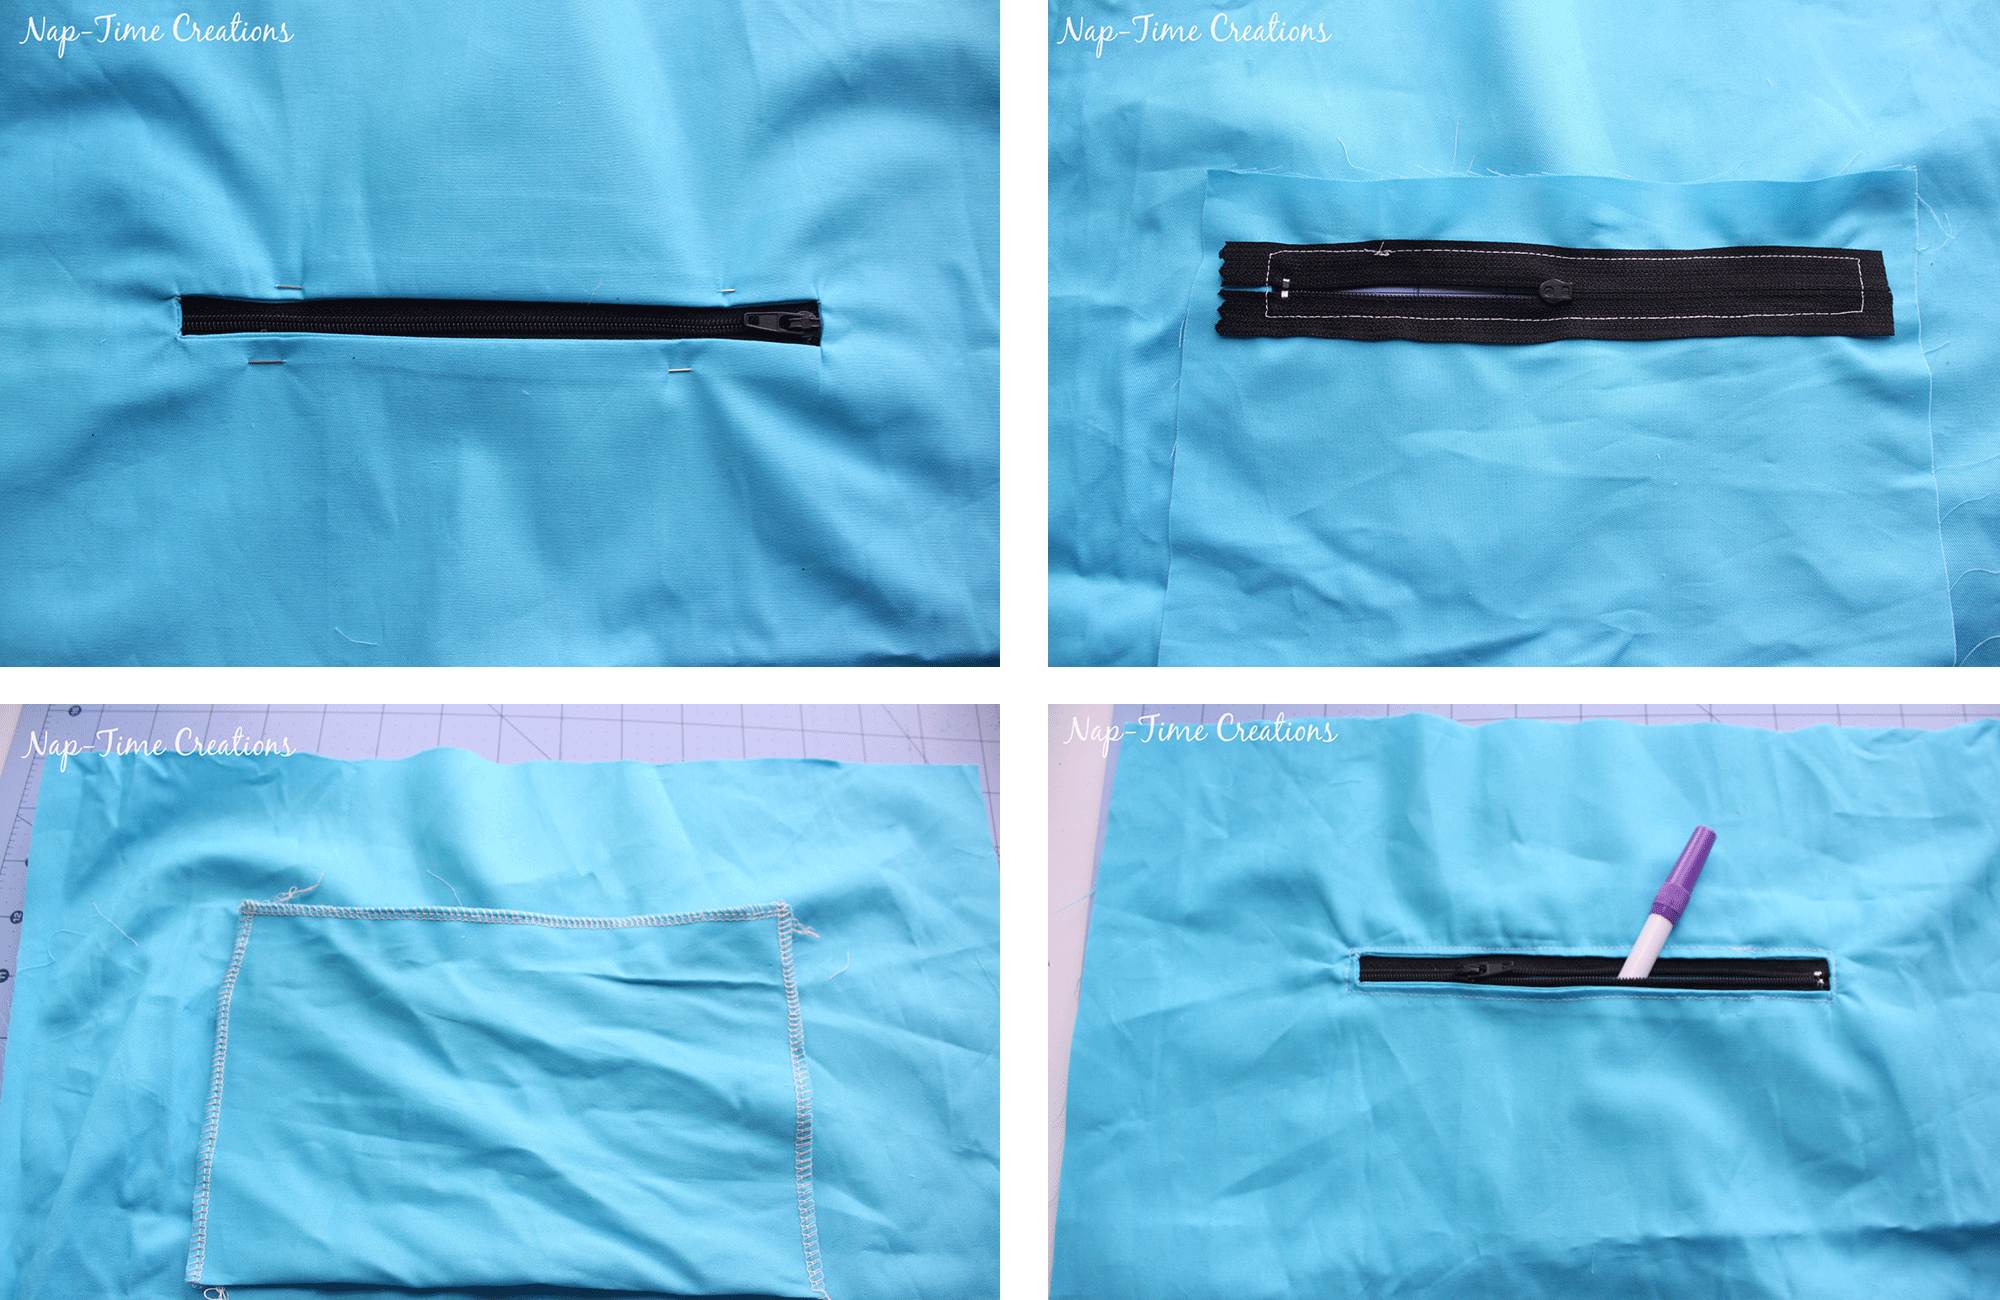
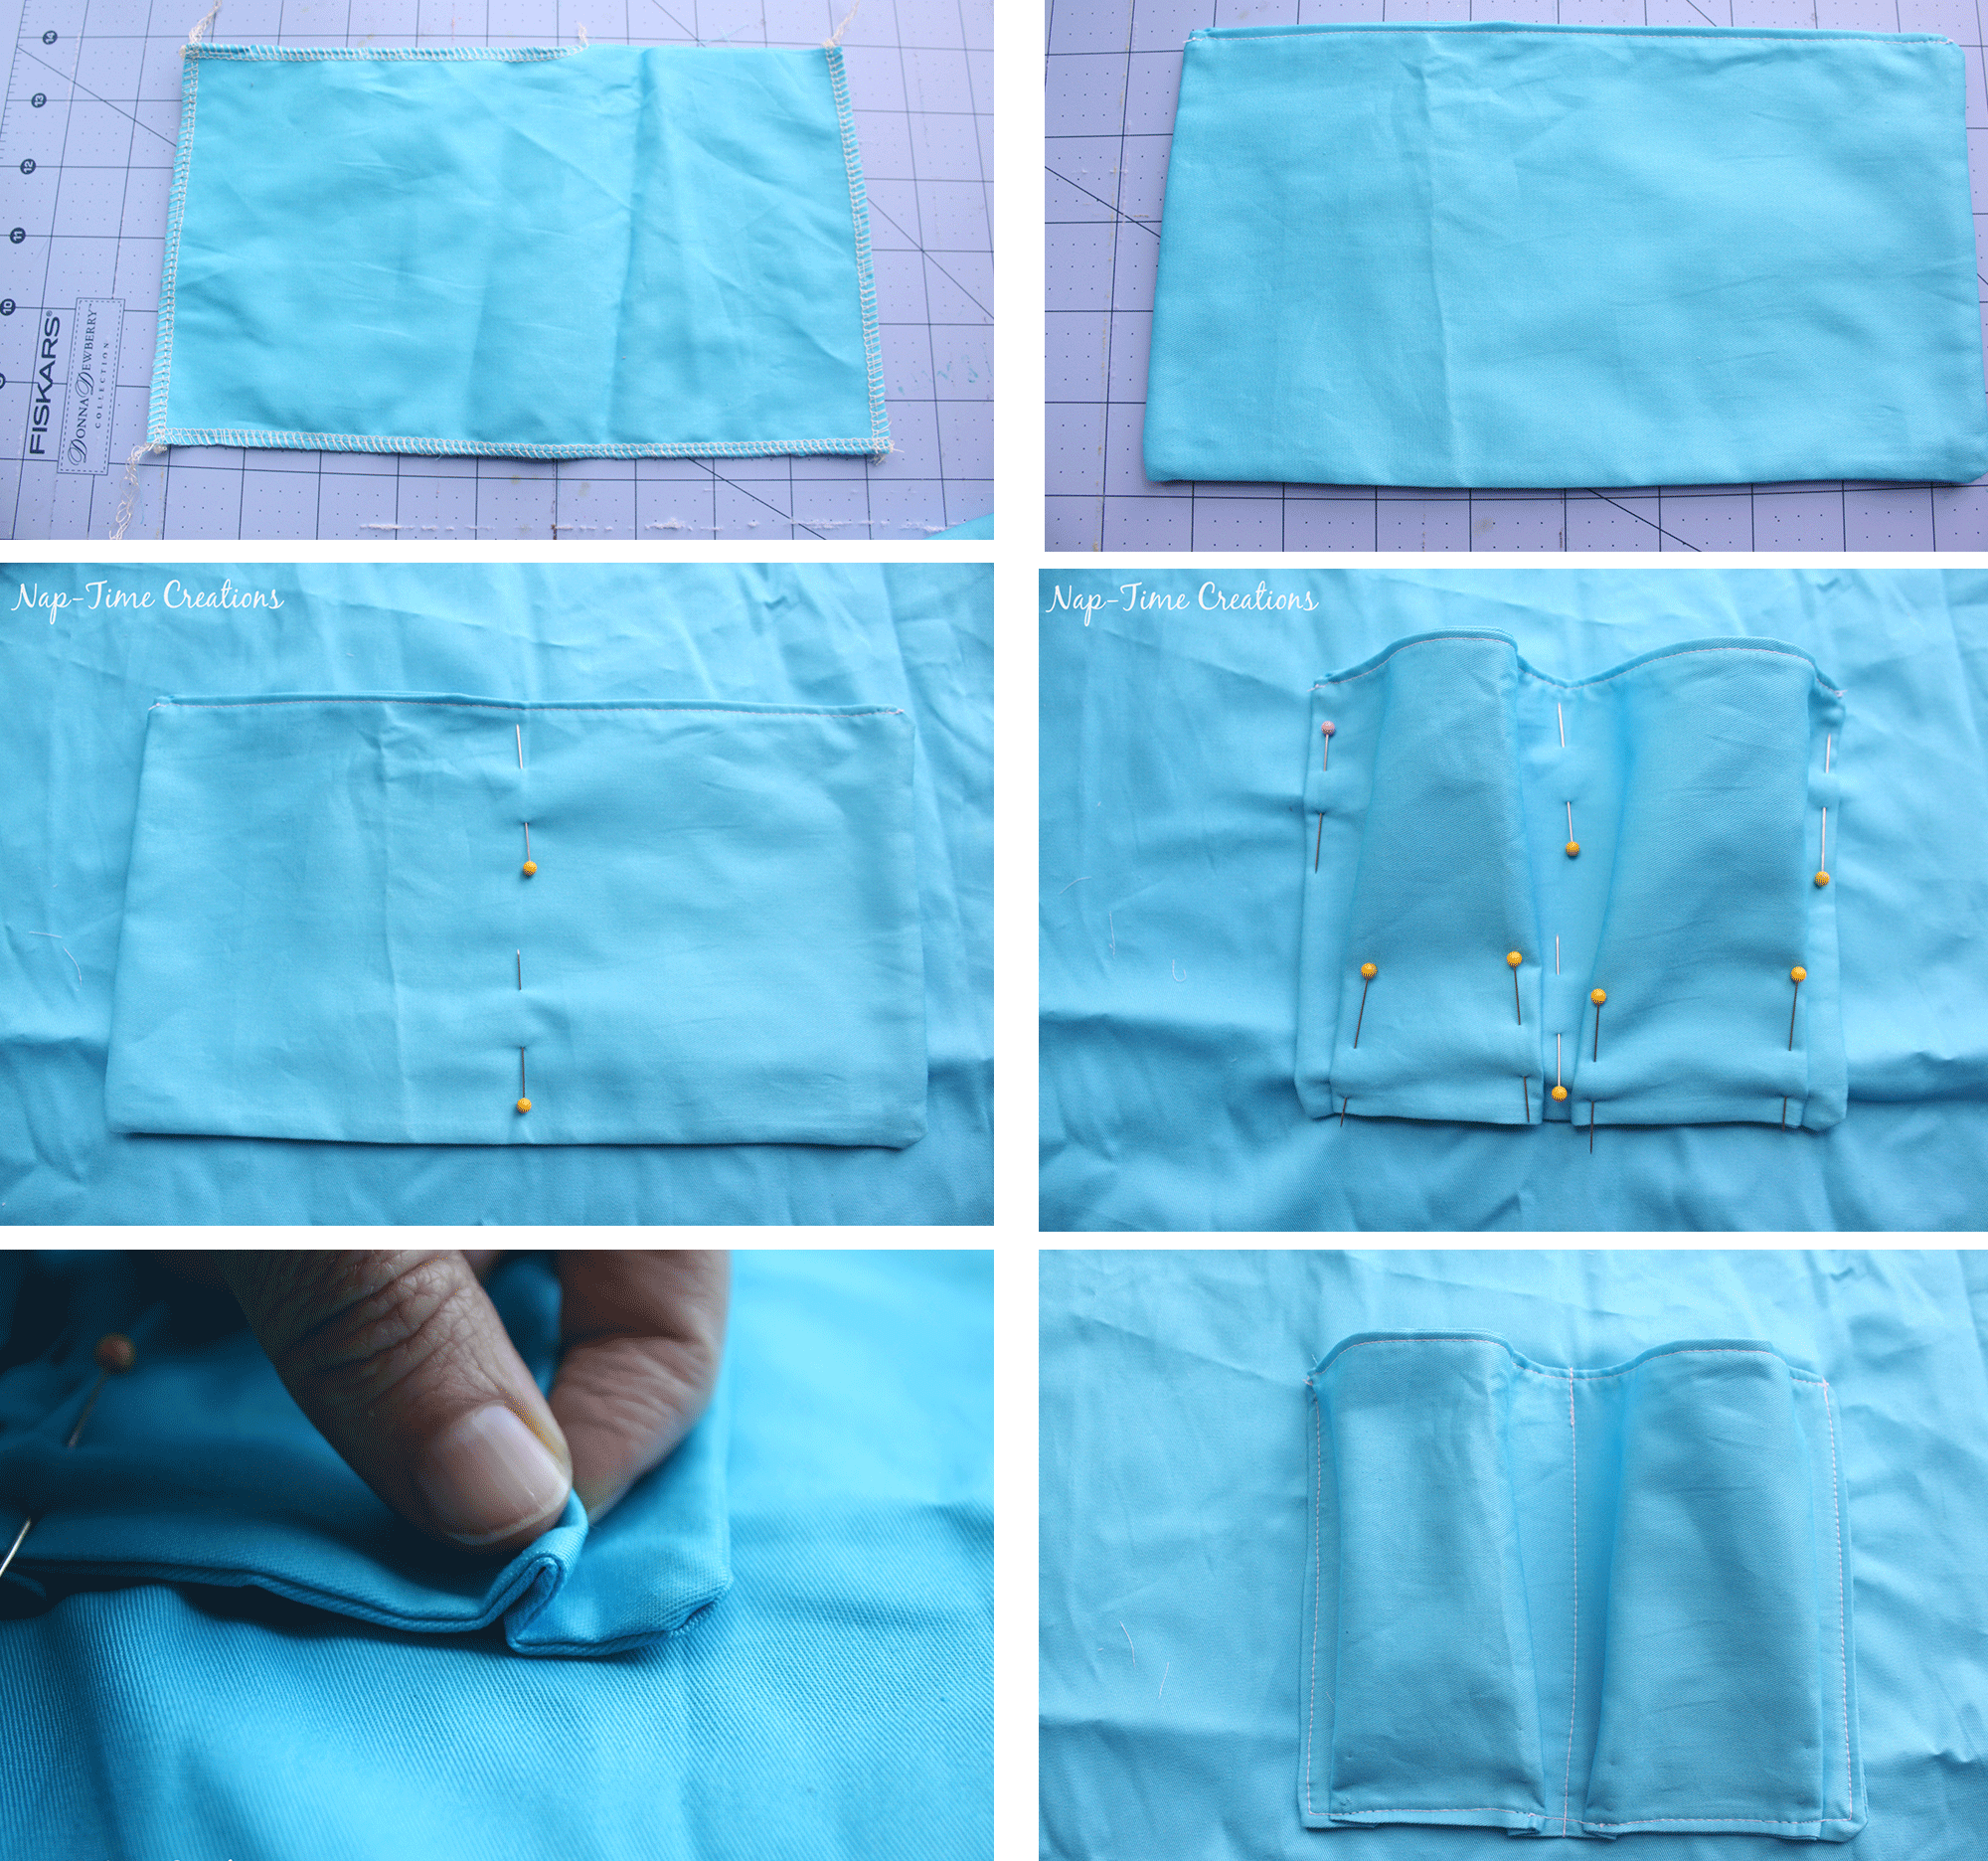
For the open-top pocket {for the other side of the bag sew the two pieces together, right sides touching. Leave an opening on one long side, turn and top-stitch that side. That is the top of the pocket. Put the pocket top 3″ down from top of bag liner {the other side from the zipper} and pin the center. Fold the two sides as shown to pleat and create pocket compartments. Sew sides and bottom of pocket to secure.
How to sew the bag zipper
Take the two bag lining pieces {with pockets} and the inside zipper facing pieces. Lay the zipper along the top of the one liner with the tab end extending 2″ from side. The wrong side of the zipper should be touching the right side of the lining.
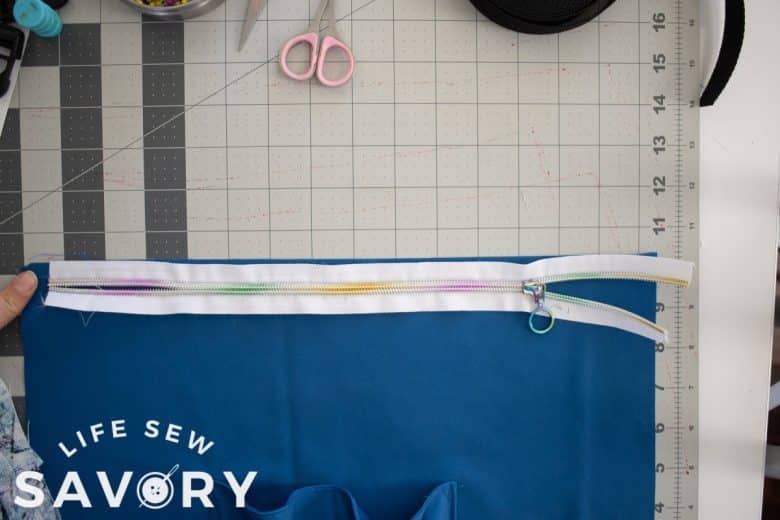
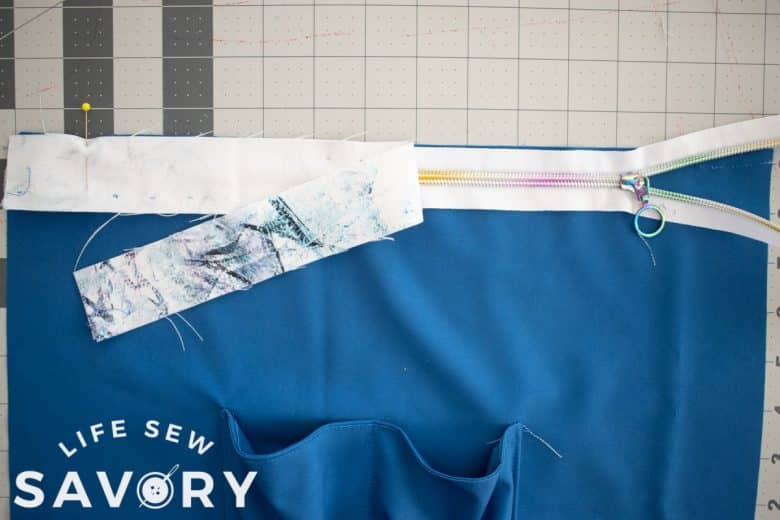
Cover with facing fabric. Pin and sew all three layers starting and stopping 1.5″ from either side. DO NOT sew to the edges.
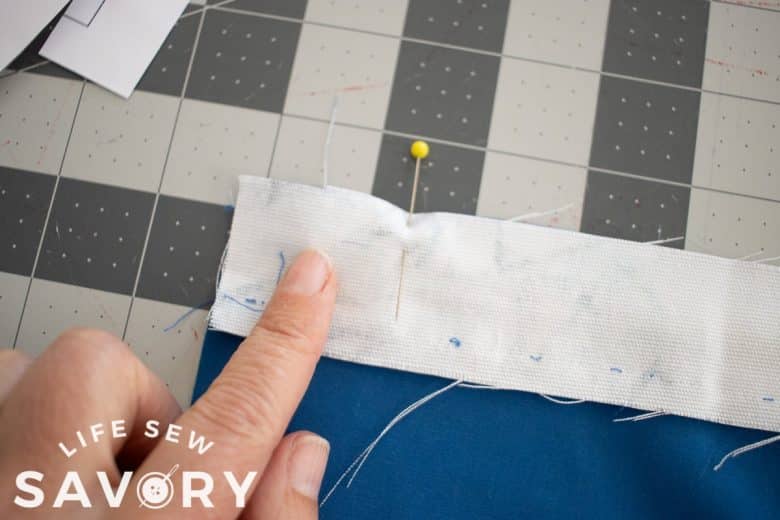
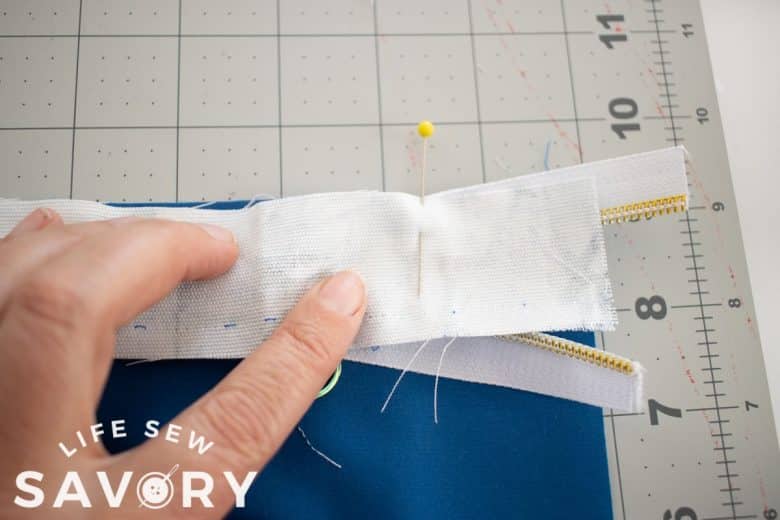
On those open ends you will pull up the end of the zipper without the pull tab {trim if necessary}
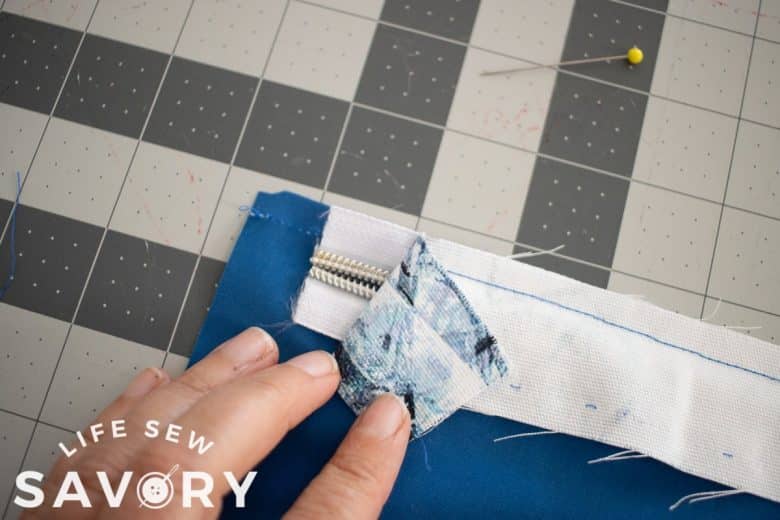
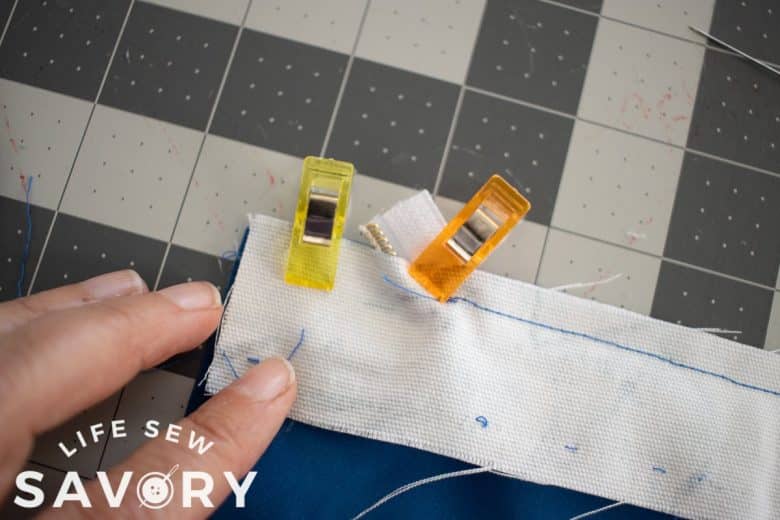
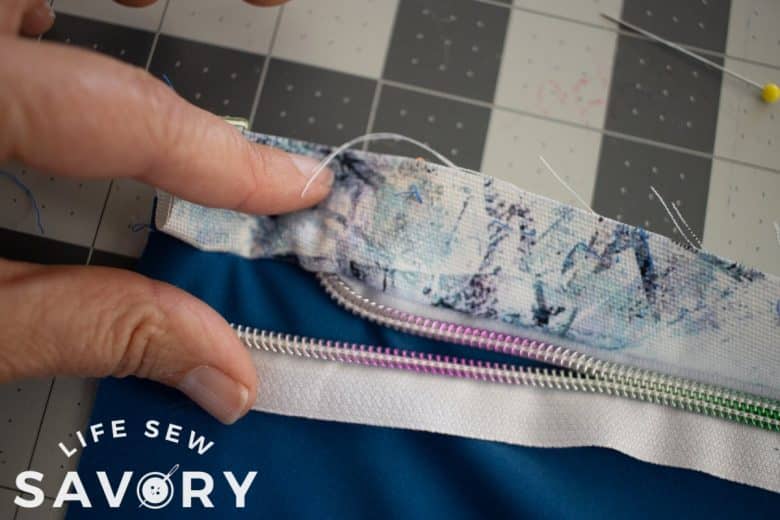
On the side with the pull tab, pull the zipper down and out of the seam. Sew the ends closed. Be careful when sewing over zipper end, I broke a needle… go slow!
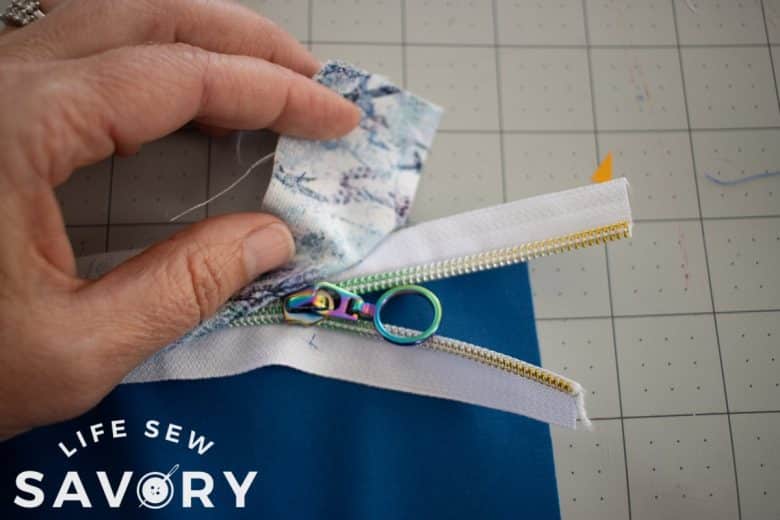
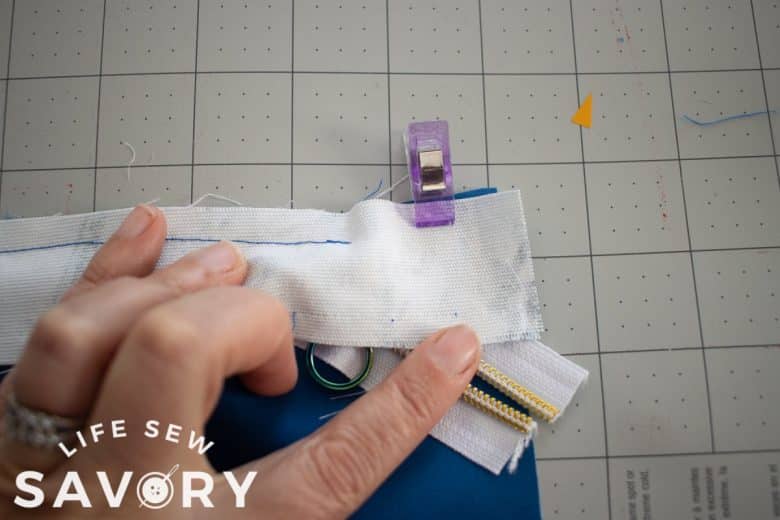
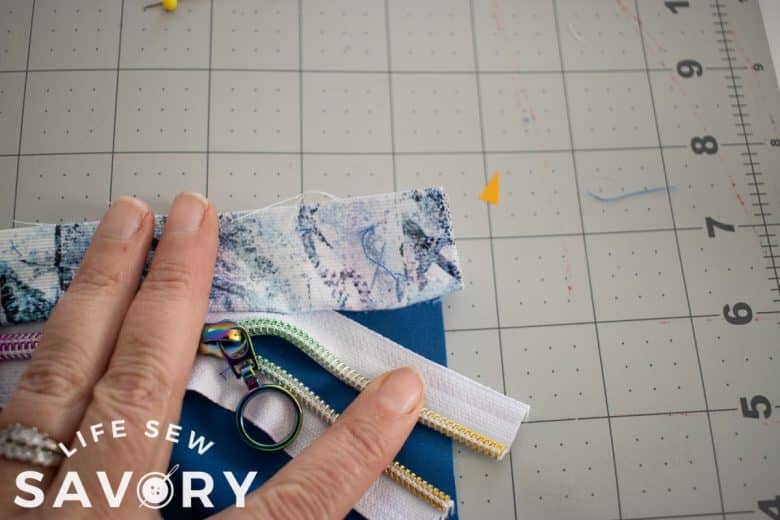
Now that this zipper facing is completely sewn on fold it back away from the zipper and pin to the lining. This will keep it from getting in the way. Take the second side of the bag lining face up and place the zipper also right side up and line up the top edge of the zipper AND the sides of the lining.
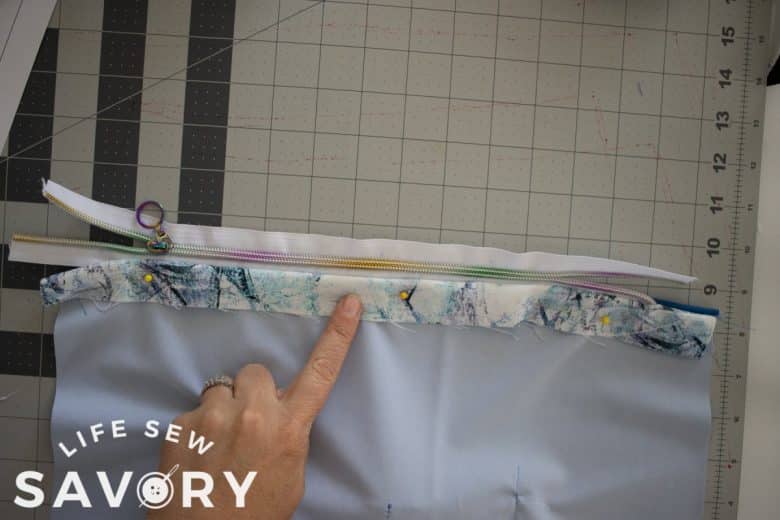
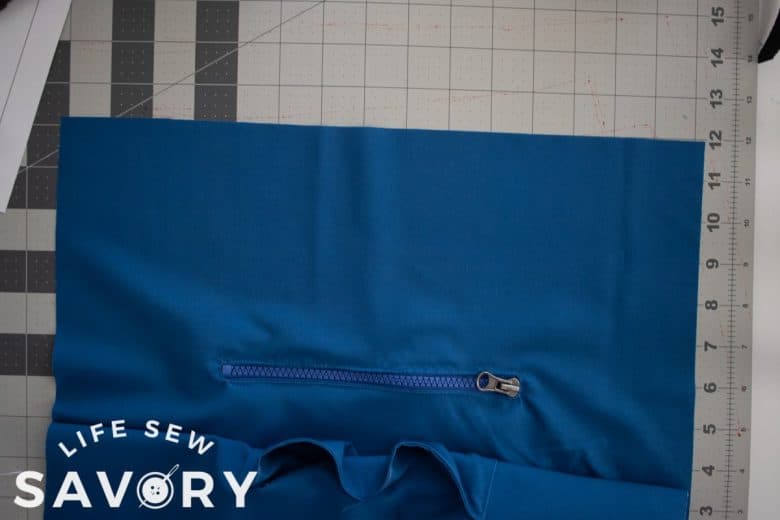
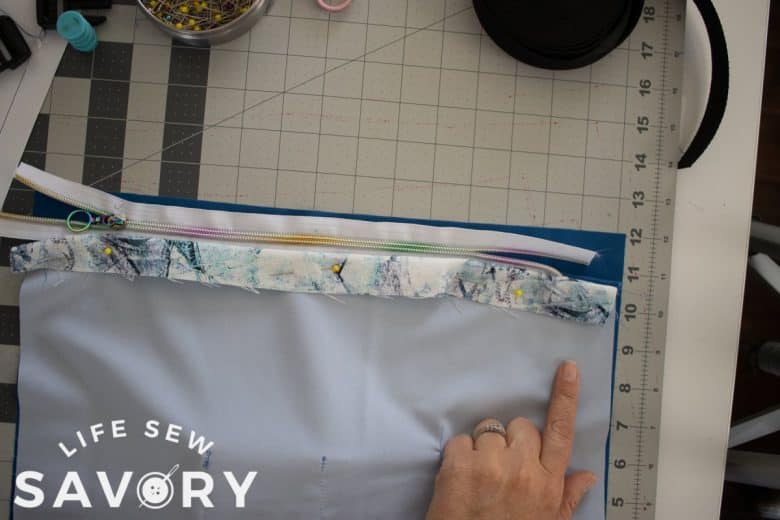
Place the zipper lining, right side down and sew the three layers as above. Again DO NOT sew the 1.5″ on either end of the zipper.
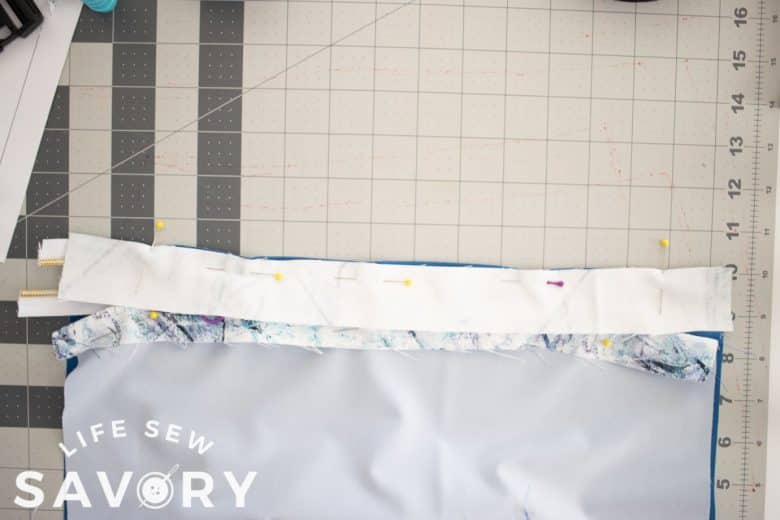
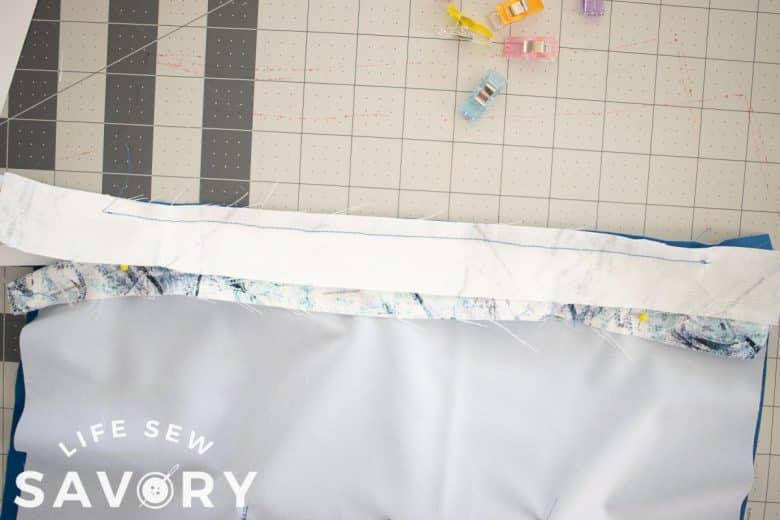
Fold the end up and the tab end down and the end up and sew the ends just as above. Sew the ends.
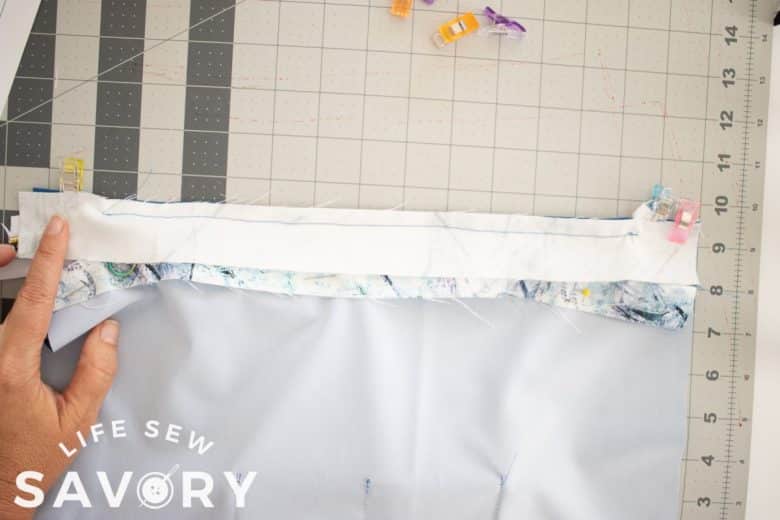
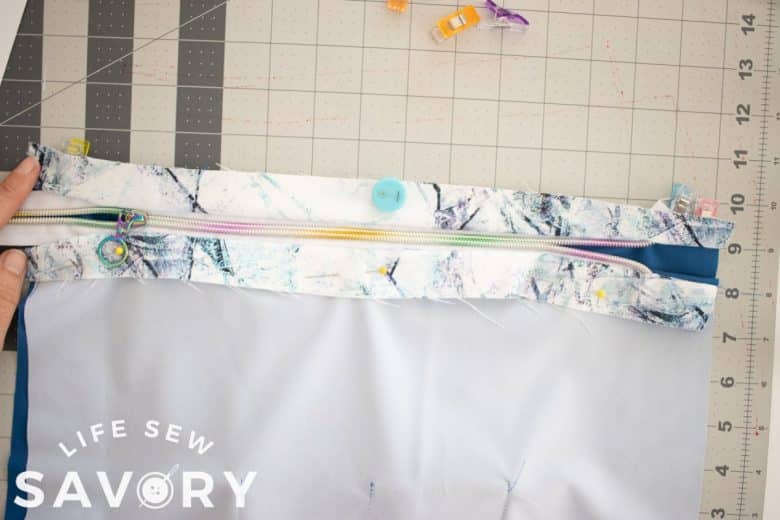
Here’s what the inside of the lining looks like, and the right side of the zipper looks like the second photo.
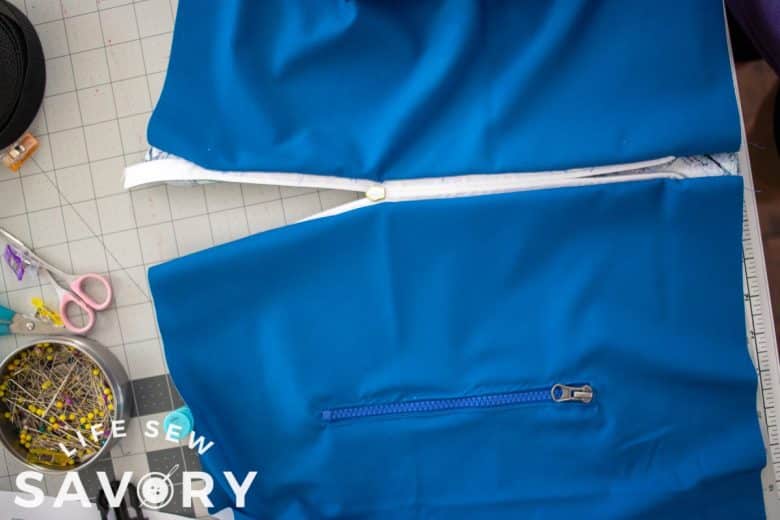
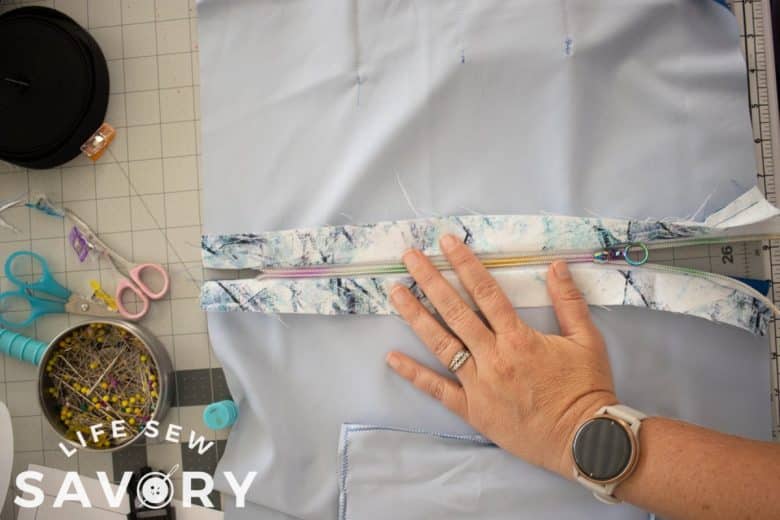
Create a simple tab cover if desired {no pattern piece} make a small rectangle, sew, turn, tuck in raw edges. Place over zipper end, and sew bottom edge to secure.
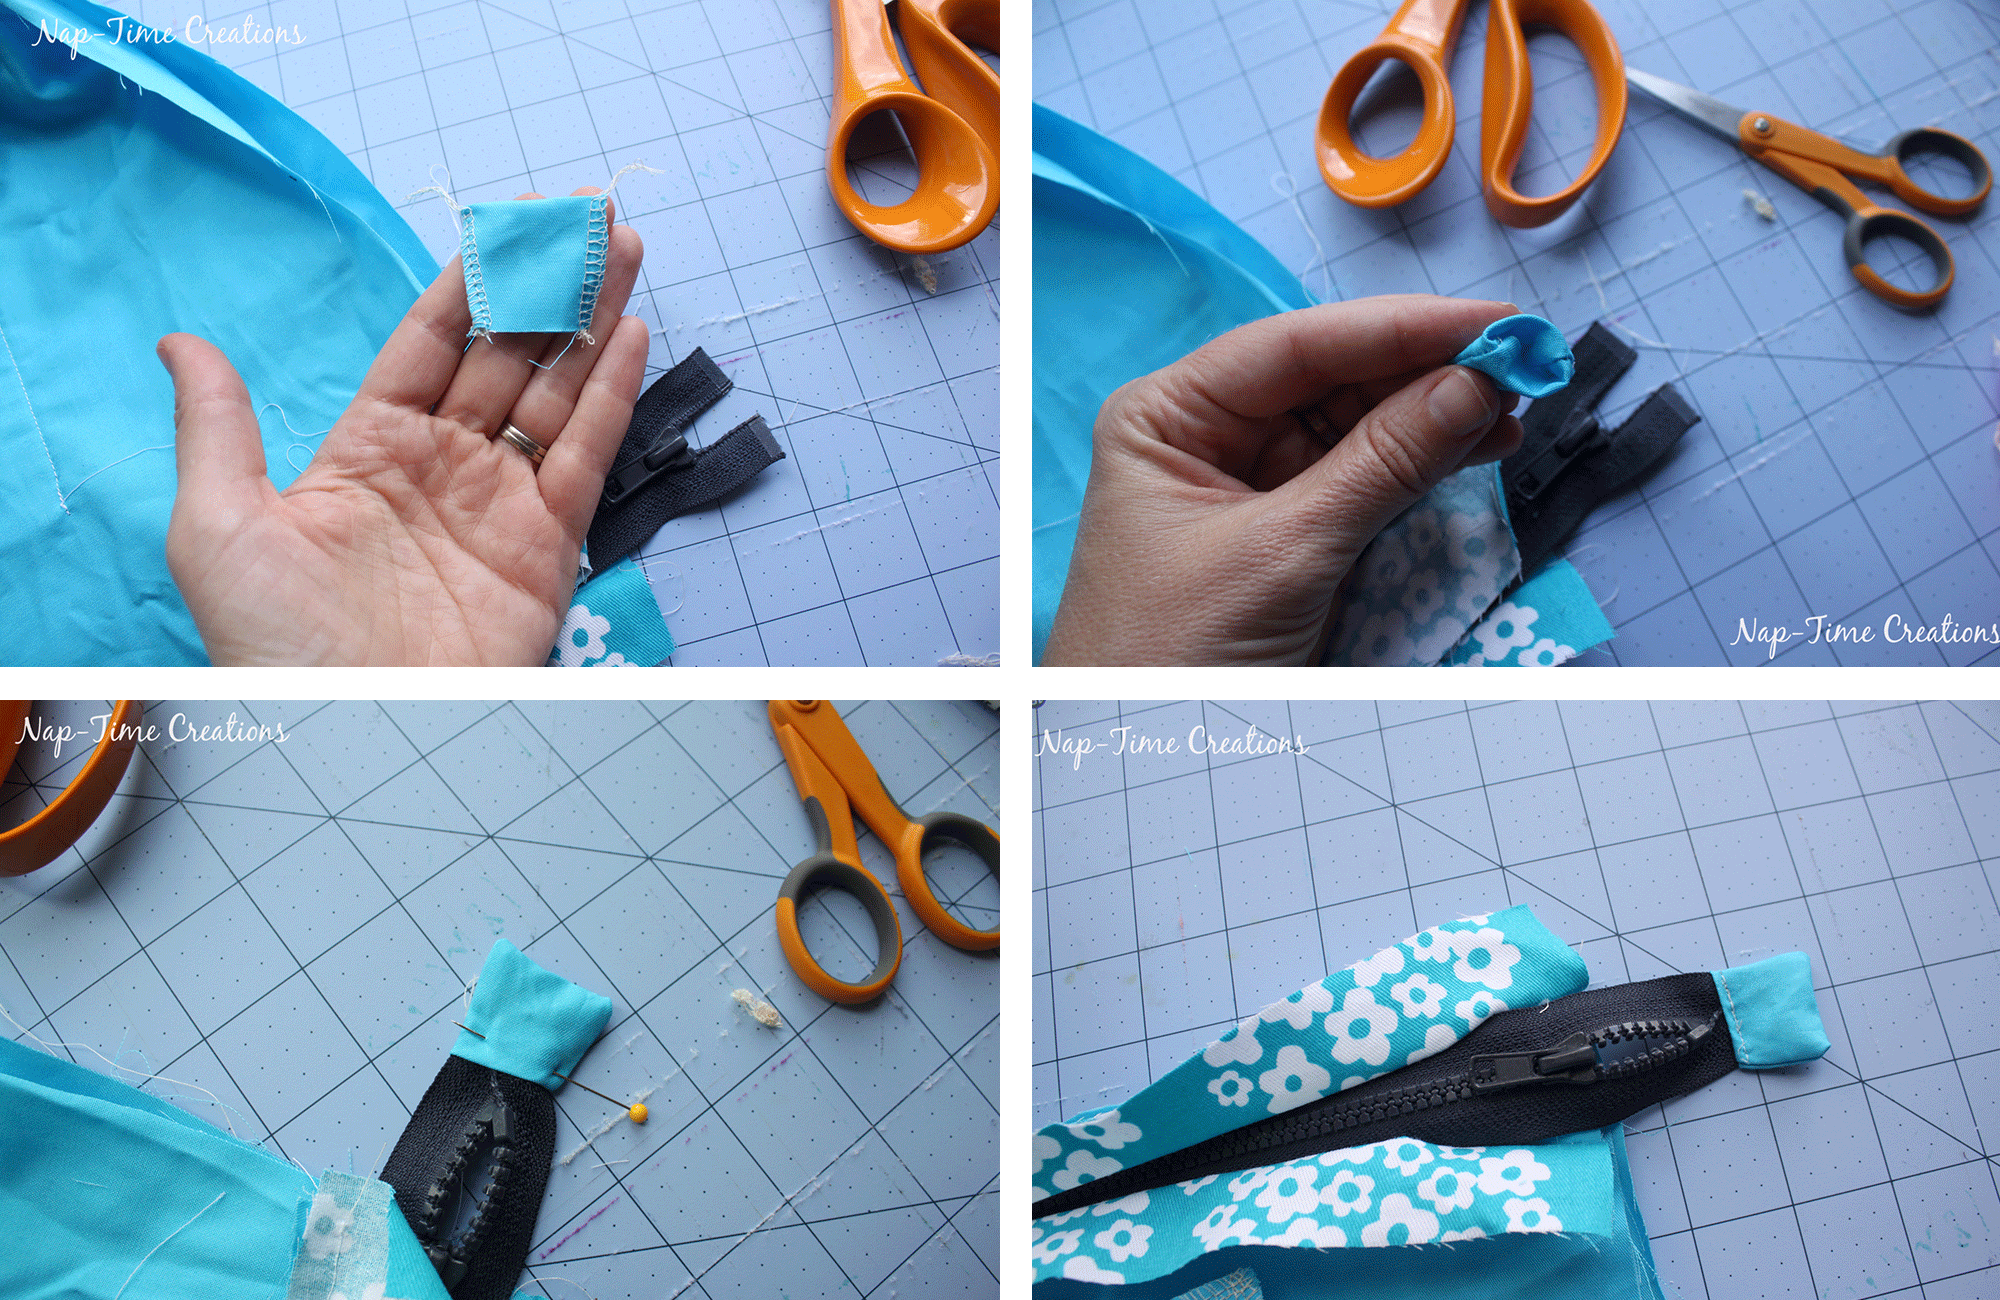
Now we will sew the sides of the liner together. With right sides together, place the liners on top of each other, and keep the zipper facings UP, fold the zipper down and inside the bag. Keep out of the way. Sew down the side and bottom edges of the liner.
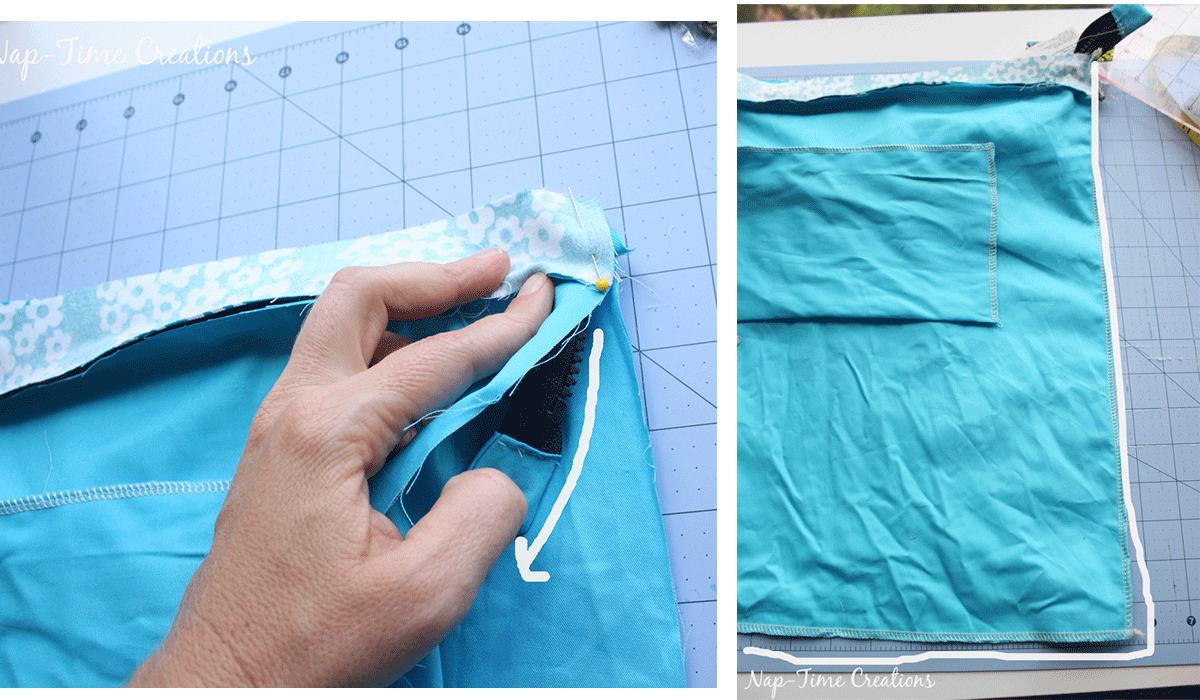
We need to shape the liner to match the bag outside. Fold the corners of the bag like this with the seams on the outside. Sew straight across the triangle, 3″ from the point. Trim. You now have square corners and this will fit well in the outer bag shell.
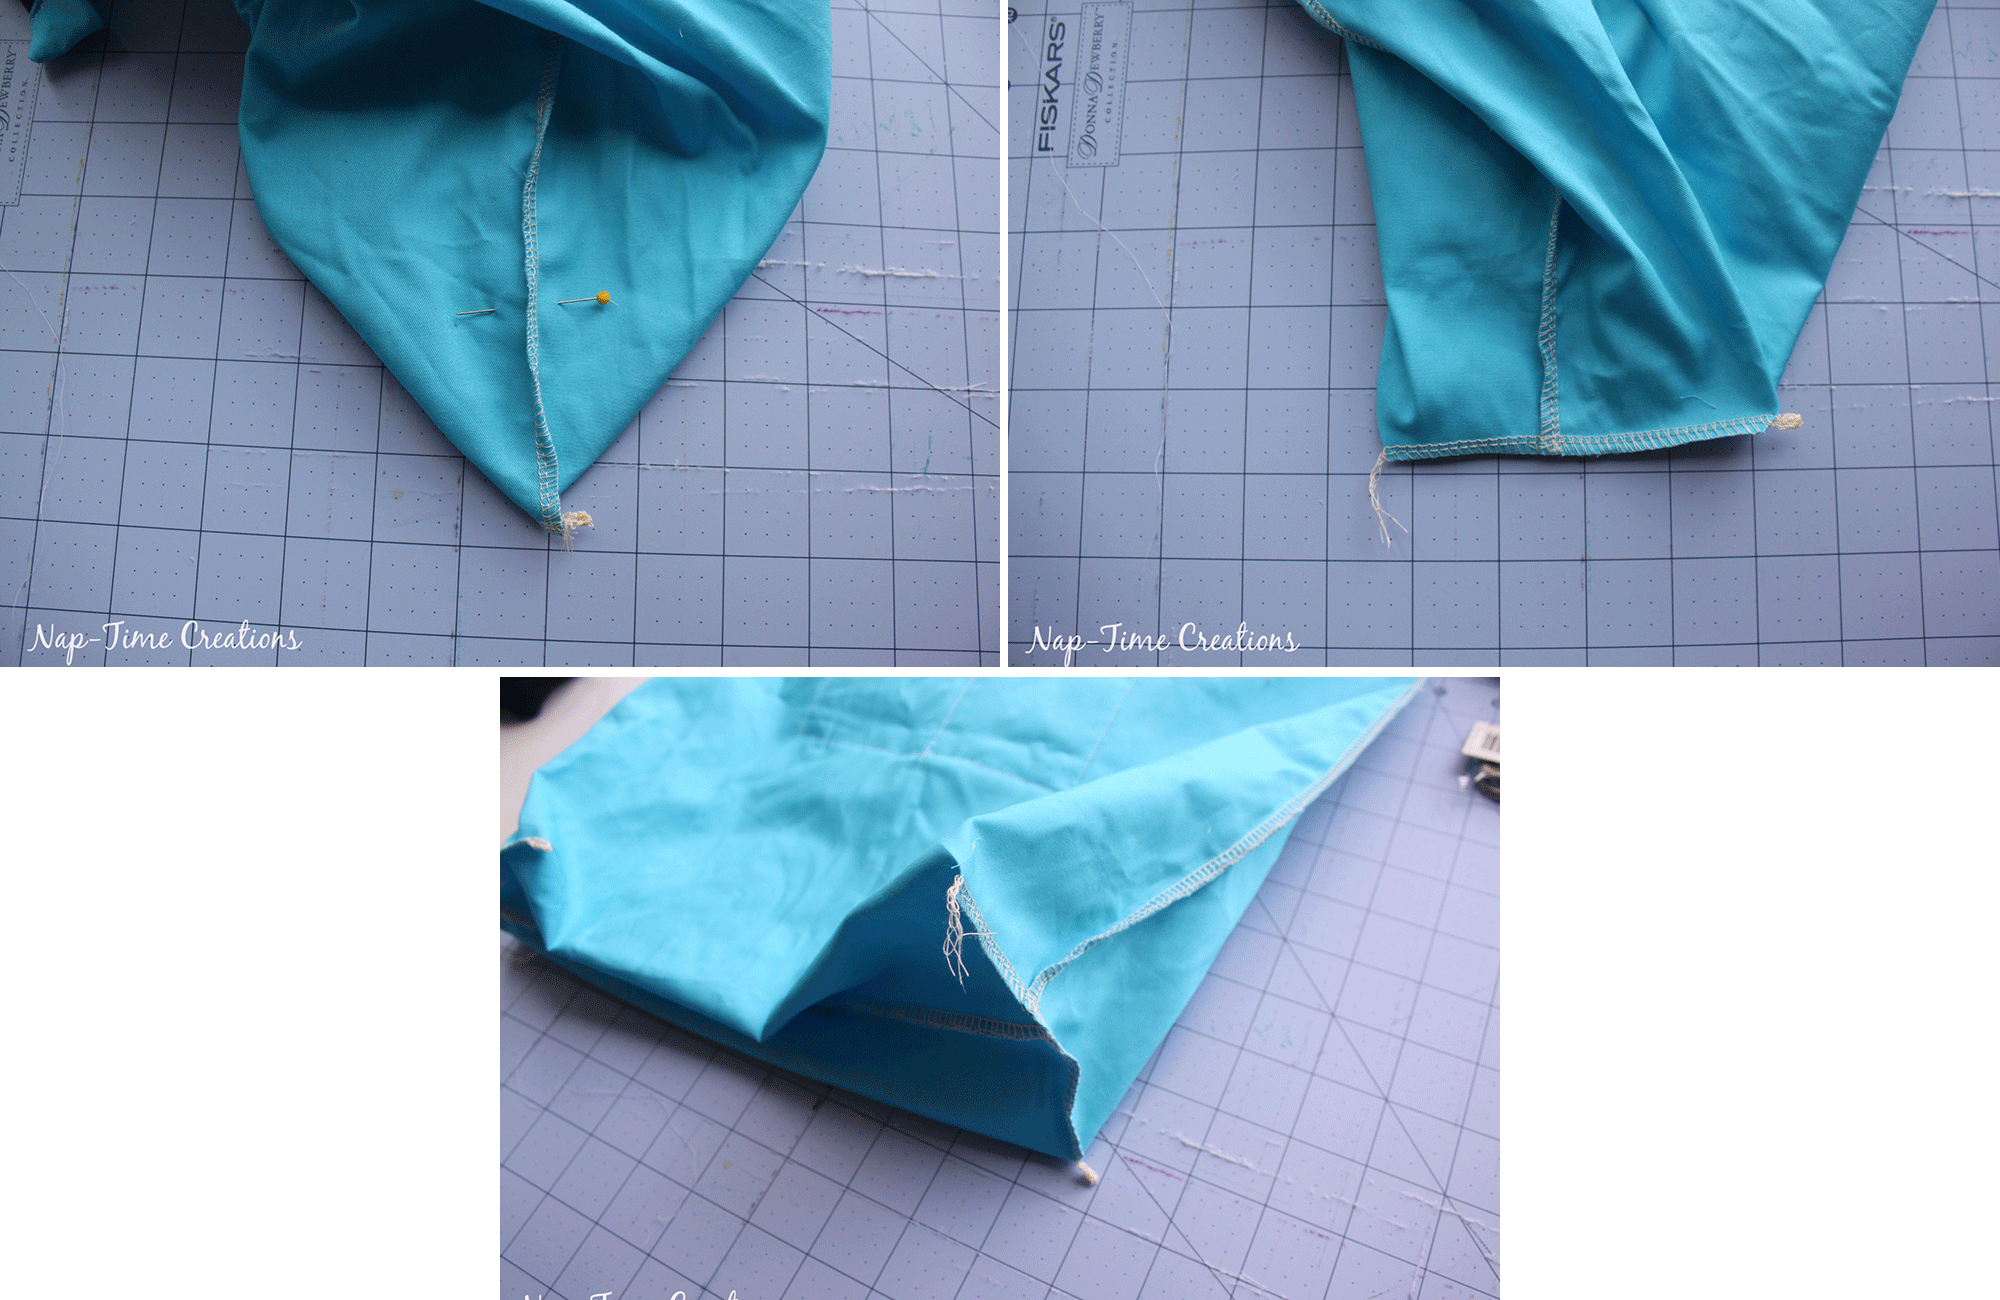
Finish the straps on the convertible purse / backpack free sewing pattern
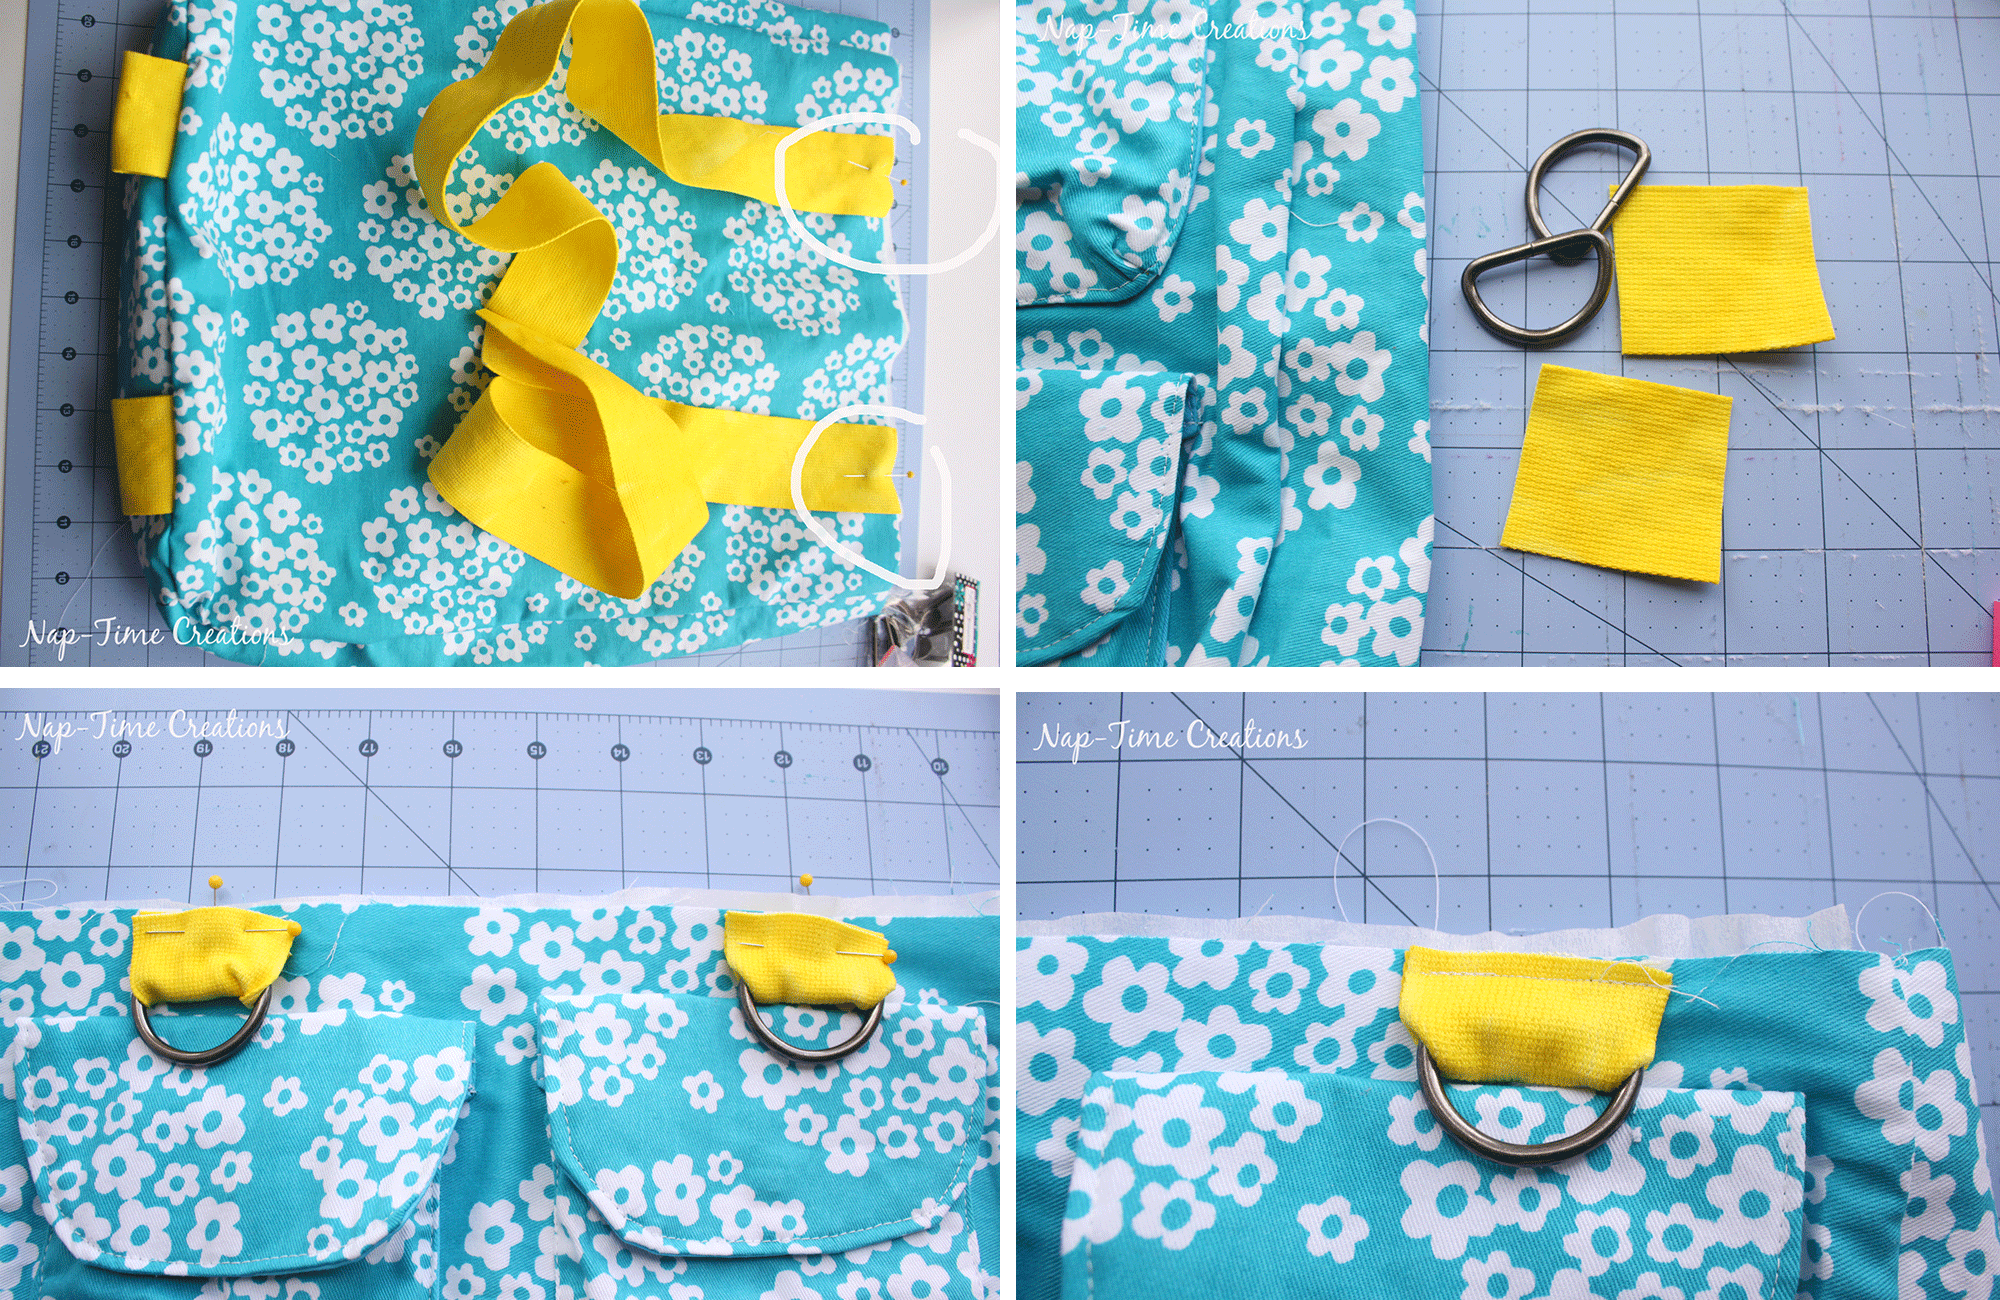
On the same side of the main bag where you have the bottom strap loops, stitch the long straps 2″ from either edge, with the straps going down the back side of the bag. These straps should be at least 22″ long, but You should make sure they are long enough for your back at this point. Cut 2″ long pieces of strap for the D rings. {or buckles}
On the front of the bag main, stitch the straps with D rings {or buckles} 2″ from the front sides. Stitch to hold in place.
Time to put it all together… Put the main bag inside the liner with the right sides together. Match the sides and pin around. Sew with a 3/8 seam around the bag leaving an opening between the two long straps to turn. Turn the bag and tuck the liner down inside the main bag. Top-stitch around to close the opening and reinforce the straps. Here’s a close up of the top-stitching.
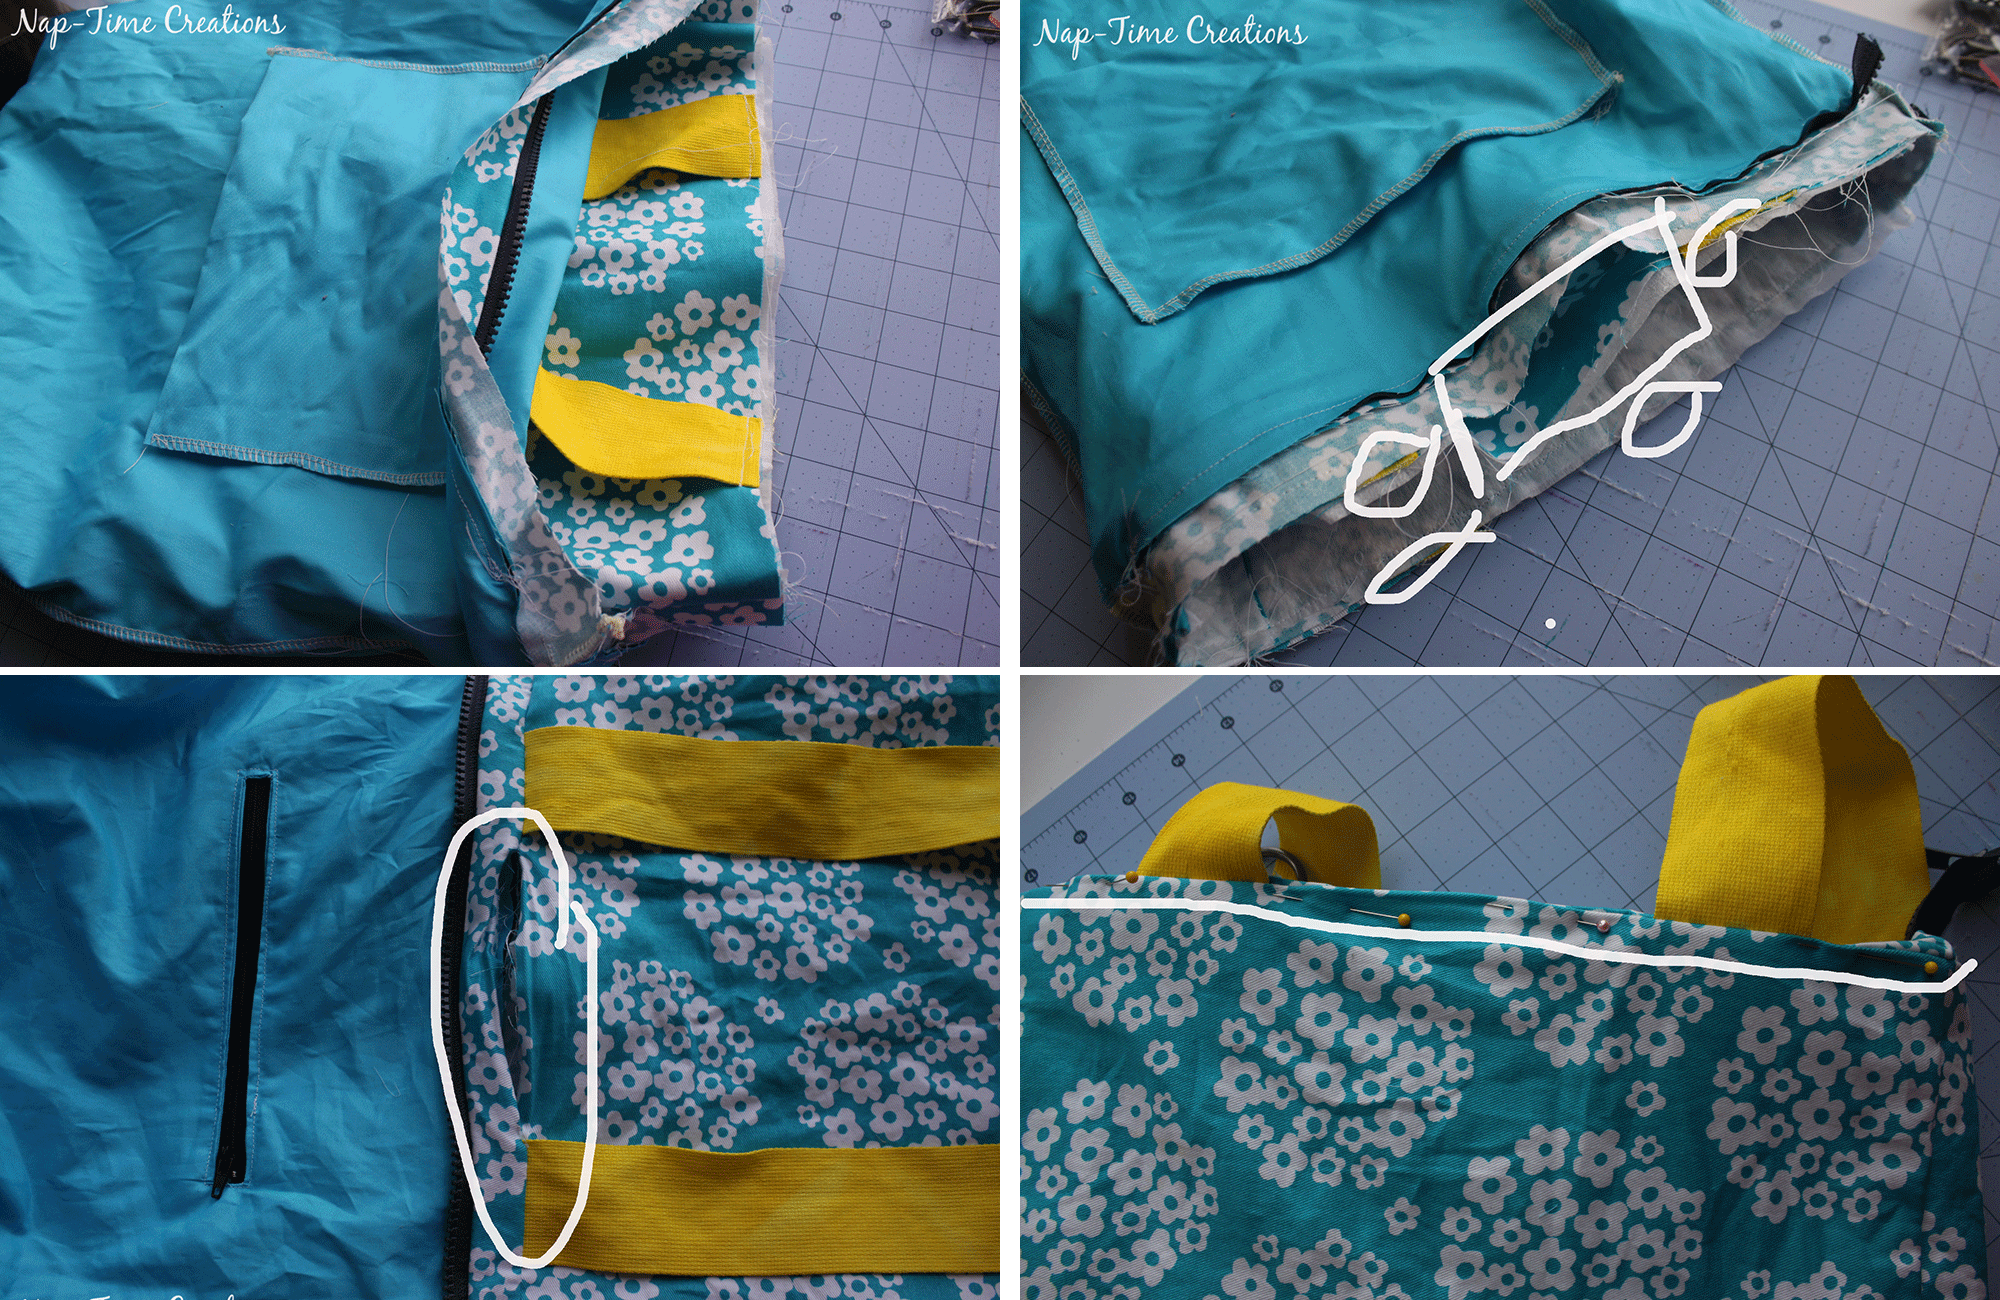
Sew the bag clips {or buckles} to the ends of the long straps. Thread through, then fold over twice to finish. Sew top of fold. Cross and clip to D-rings to have a shoulder bag.
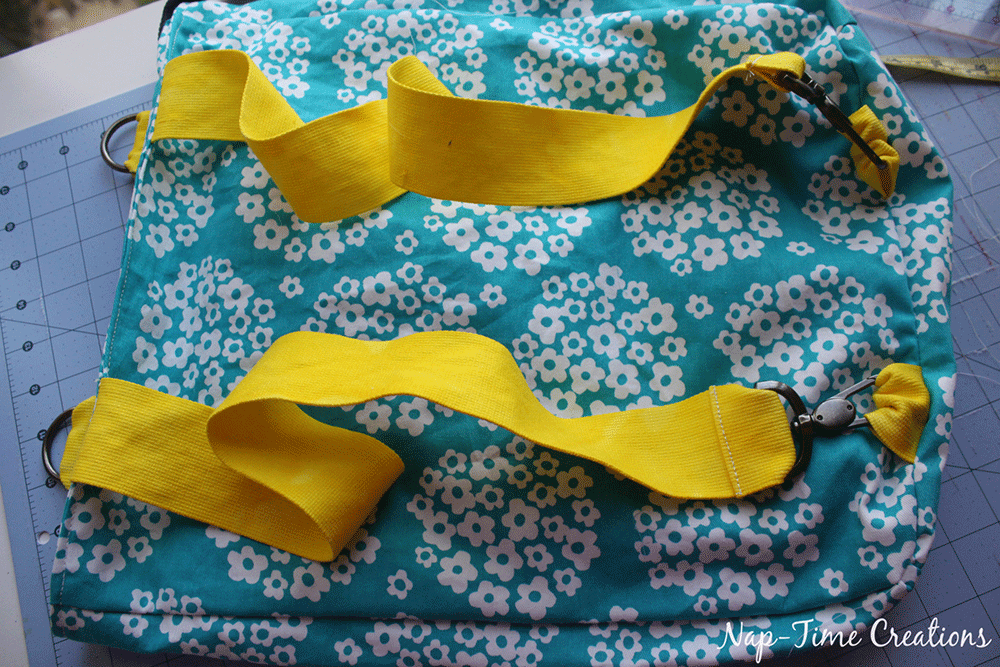
OR, clip to the strap loops on the bottom for a backpack. YOU DID IT!
AND if you’ve read all the way through this and still haven’t gone to grab your convertible purse/backpack free sewing pattern here’s one last link to go grab it here.







Enid Mejias says
I want to thank you for this free tutorial and pattern. I read the instructions carefully. I’m a newbie visual sewer. And it overwhelmed me. Is there a way that you can do a YouTube video tutorial so that I can follow along. Thanks.
Emily says
at this time I don’t have a video for this pattern. It’s not really a beginner sewing project, but I’m happy to help if you have questions.
Rebecca Peters says
Love this bag! I got the pattern but where are the directions
Rebecca Peters says
Found them – Never mind. Sorry. I can hardly wait to make this.
JJ says
Hi, Thanks for the free pattern. I’m assuming you tape all the pieces together because what’s left, after you cut out the pockets and such, is the bag but it doesn’t say it anywhere. If so, what are the measurements of that piece and do we cut 2 or is it on the fold? I’ve already printed and cut out the pieces and don’t want to reprint it. Thanks.
Emily says
On page 1 of the pattern it lists all the other pieces of the bag you need to cut. These DO NOT have pattern pieces as they are all rectangles. You will cut the bag and other pieces from this list. refer to page 1 of the printed pattern for all the details.
JJ says
Thanks, I was just coming back to say never mind, went back to the first page and saw the measurements.
Gertie says
Thanks for the instihg. It brings light into the dark!
Tricia says
Love this idea of a convertible! Was wondering what you used for the strapping? Can you just make some strapping with quilting cotton? Maybe add some interfacing? Or with canvas? Thanks in advance!
Emily says
The straps I used were purchased by the yard from the strapping section of the fabric store. You for sure could make your own with just fabric.. would work great!
Tricia says
Awesome! Thank you! Can you tell me the width of the strap? Yours look like a good width…I have trouble with picking out the right width for stuff like that. Sometimes I get it right but others I’m too wide or too thin. Thanks! =)
Tricia says
Weird That your other reply doesn’t show up. Anyways, I was wondering what the seam allowances are and are they included in the pattern? Thank you.
Bettina says
Thank you for the free pattern! I just finished and it turned out pretty good. I didnt’ know what the seam allowance was when i did the pockets and assumed 1/2 inch since this was a bad. I really think its 1/4″ though since that was the only way I could get the side pieces to fit right. My pockets are quite small but big enough for my keys, my work pass, and the big pocket still holds my phone and glasses.
I ended up using longer straps and putting them on a slider thingie so they would be adjustable. Now I have a backpack/sholder bag/cross body bag combo!
Thanks again.
A.J. says
Where did you get the adjuster thing from? Love the idea of converting to three forms. Just cant find the adjusters.
Emily says
What adjusters you mean? The clips? You can find them on amazon or local fabric/sewing store.
http://www./ says
Yesterday, while I was at work, my sister stole my apple ipad and tested to see if it can survive a twenty five foot drop, just so she can be a youtube sensation. My iPad is now broken and she has 83 views. I know this is totally off topic but I had to share it with someone!
Ulli Stix says
I made it as a Christmas present and was told “it was the best present ever!”. I replaced the upper two little bags with a zipper bag and added a little “compartment” that can hold a bottle, but otherwise it was made as described. My mum will travel AUS and NZ for 4 month and the bag will join her on the way!!
Thanks so much!!!
Lots of love from Austria/Europe
A.J. says
Did you replace the little bags on the outside or inside? Also would love to see a picture of what you did.
Wendi Lewis says
We loved this pattern. Thank you for sharing it.
I would post a picture of our completed pack. But I don’t know how.
Craftsmode says
Hello thanks to share!!!! Is lovely I would like to do it me too.
Perhaps you explained it But I didn’t saw and I wanted to ask you if when I Cut the fabric I must do it for the line that is indicated in the pattern or I must cut something larger to leave some seam allowance.
Thank you in advance
quilterp says
Thanks for a great pattern. My daughter fell in love with a heavier utility cotton with a French print, so I didn’t need to use interfacing. But, since it frays easily, I ended up zig zagging in the seam allowance for many of the seams. It was a fair trade off for me.
I found that the straps should maybe be a little longer than the 22″ specified, but that may be preference. My petite 13 year old finds them just right.
I had a little trouble following this tute’s instructions for the interior zippered pocket, but have used another tutorial in the past, so just went back to it for that part.
I really like the zipper gusset/flange at the top zipper. It’s a neat look that I may have to employ in other projects.
Thanks again!
Kmmiley says
Are the cutting instructions correct on the pattern pieces? It seems odd that only certain things are interfaced.
Emily says
yes they are correct. Certain pieces are interfaced to provide structure.
Lora says
So only one of the small pockets and one side panel are interfaced? That’s the way it reads to me. I must be confused.
Lora says
Actually, disregard my previous reply. I think I’ve figured out my misunderstanding. This is a terrific pattern. Thank you for sharing.
Lora says
Actually, disregard my previous reply. I think I’ve figured out my misunderstanding. This is a terrific pattern. Thank you for sharing.
Darlene says
I am a beginner sewer and have been looking for this type of bag forever. I will try to follow the steps and get this made. The material you used was so fun. Have never been able to get any patterns printed off Pinterest but will find someone to help. Thank you so much I’m glad I found your post. God Bless
Terri says
I just got the pattern for this awesome purse that i have been looking all over for. I go to the tutorial and it keeps say error page not found. Is the tutorial not availible anymore? I would really like to make this bag.
Stacy Phillips says
I’m having trouble finding a 15″ zipper. does it require that specific size?
Deborah Werner says
In VERY light print, after the initial write-up, and under the Other posts, there is a Pg 1/2 that you can click on. Page 2 is the tutorial, complete with lots of pictures. Hope this helps. Don’t forget to go to Craftsy to get and download the free pattern pages.
Deb
Deborah Werner says
Is there a PDF that we can download the tutorial section from? Otherwise, we need to cut/paste to a word doc, correct?
This pattern looks absolutely amazing. Just got back from 2 days on Mackinac Island, Mi. This would have been PERFECT!
Thank you!
Deb
Emily says
yes! that is correct.. there isn’t a place to print it..
Jenny says
This bag is wonderful, especially for summer day trips. Thank you for sharing at Merry Monday. Hope to see you next week!